

Parts-Kit Assembly
Tip
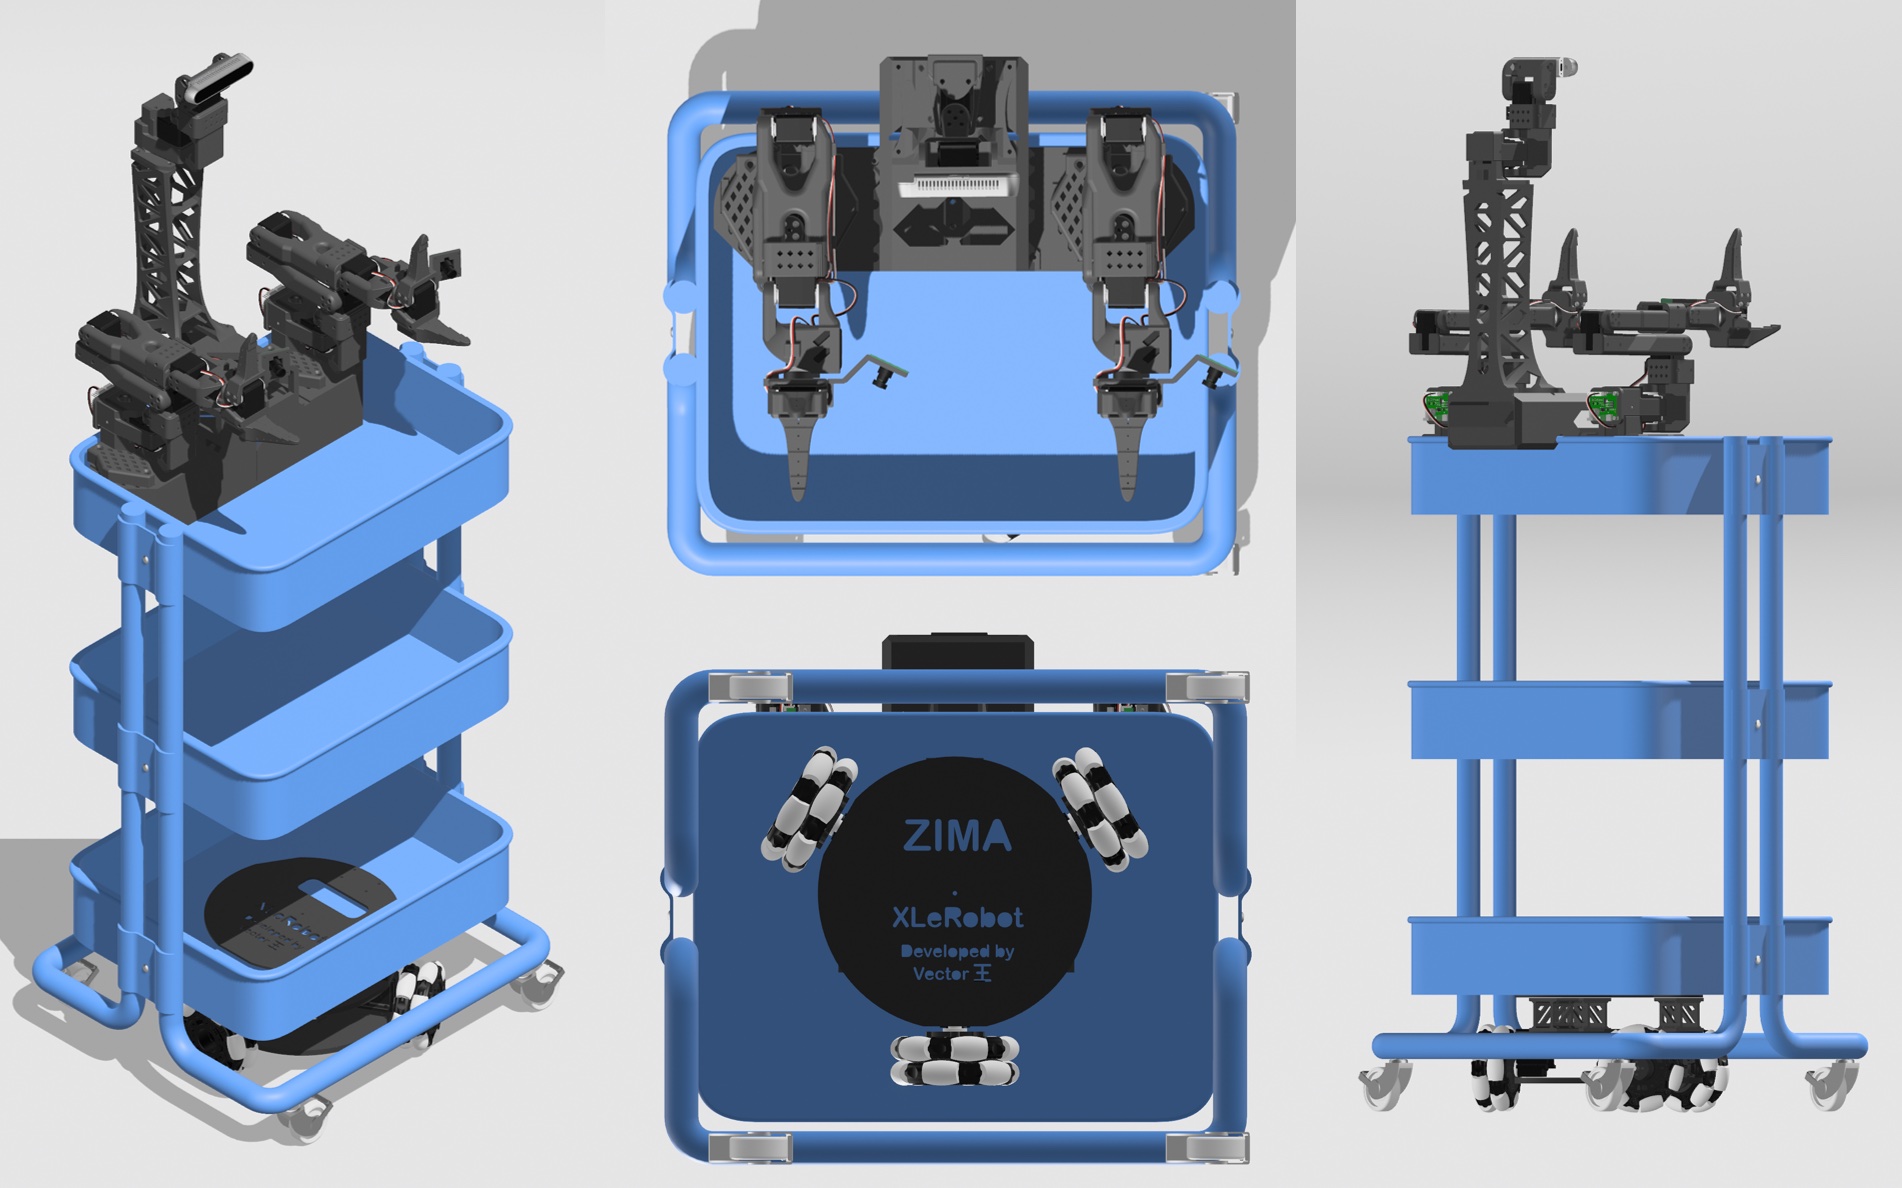
If you would rather skip the fun of tightening screws, you can also buy the pre-assembled kit for the SO101 follower arms compatible with Xlerobot.
🦾 SO101 Robotic Arm
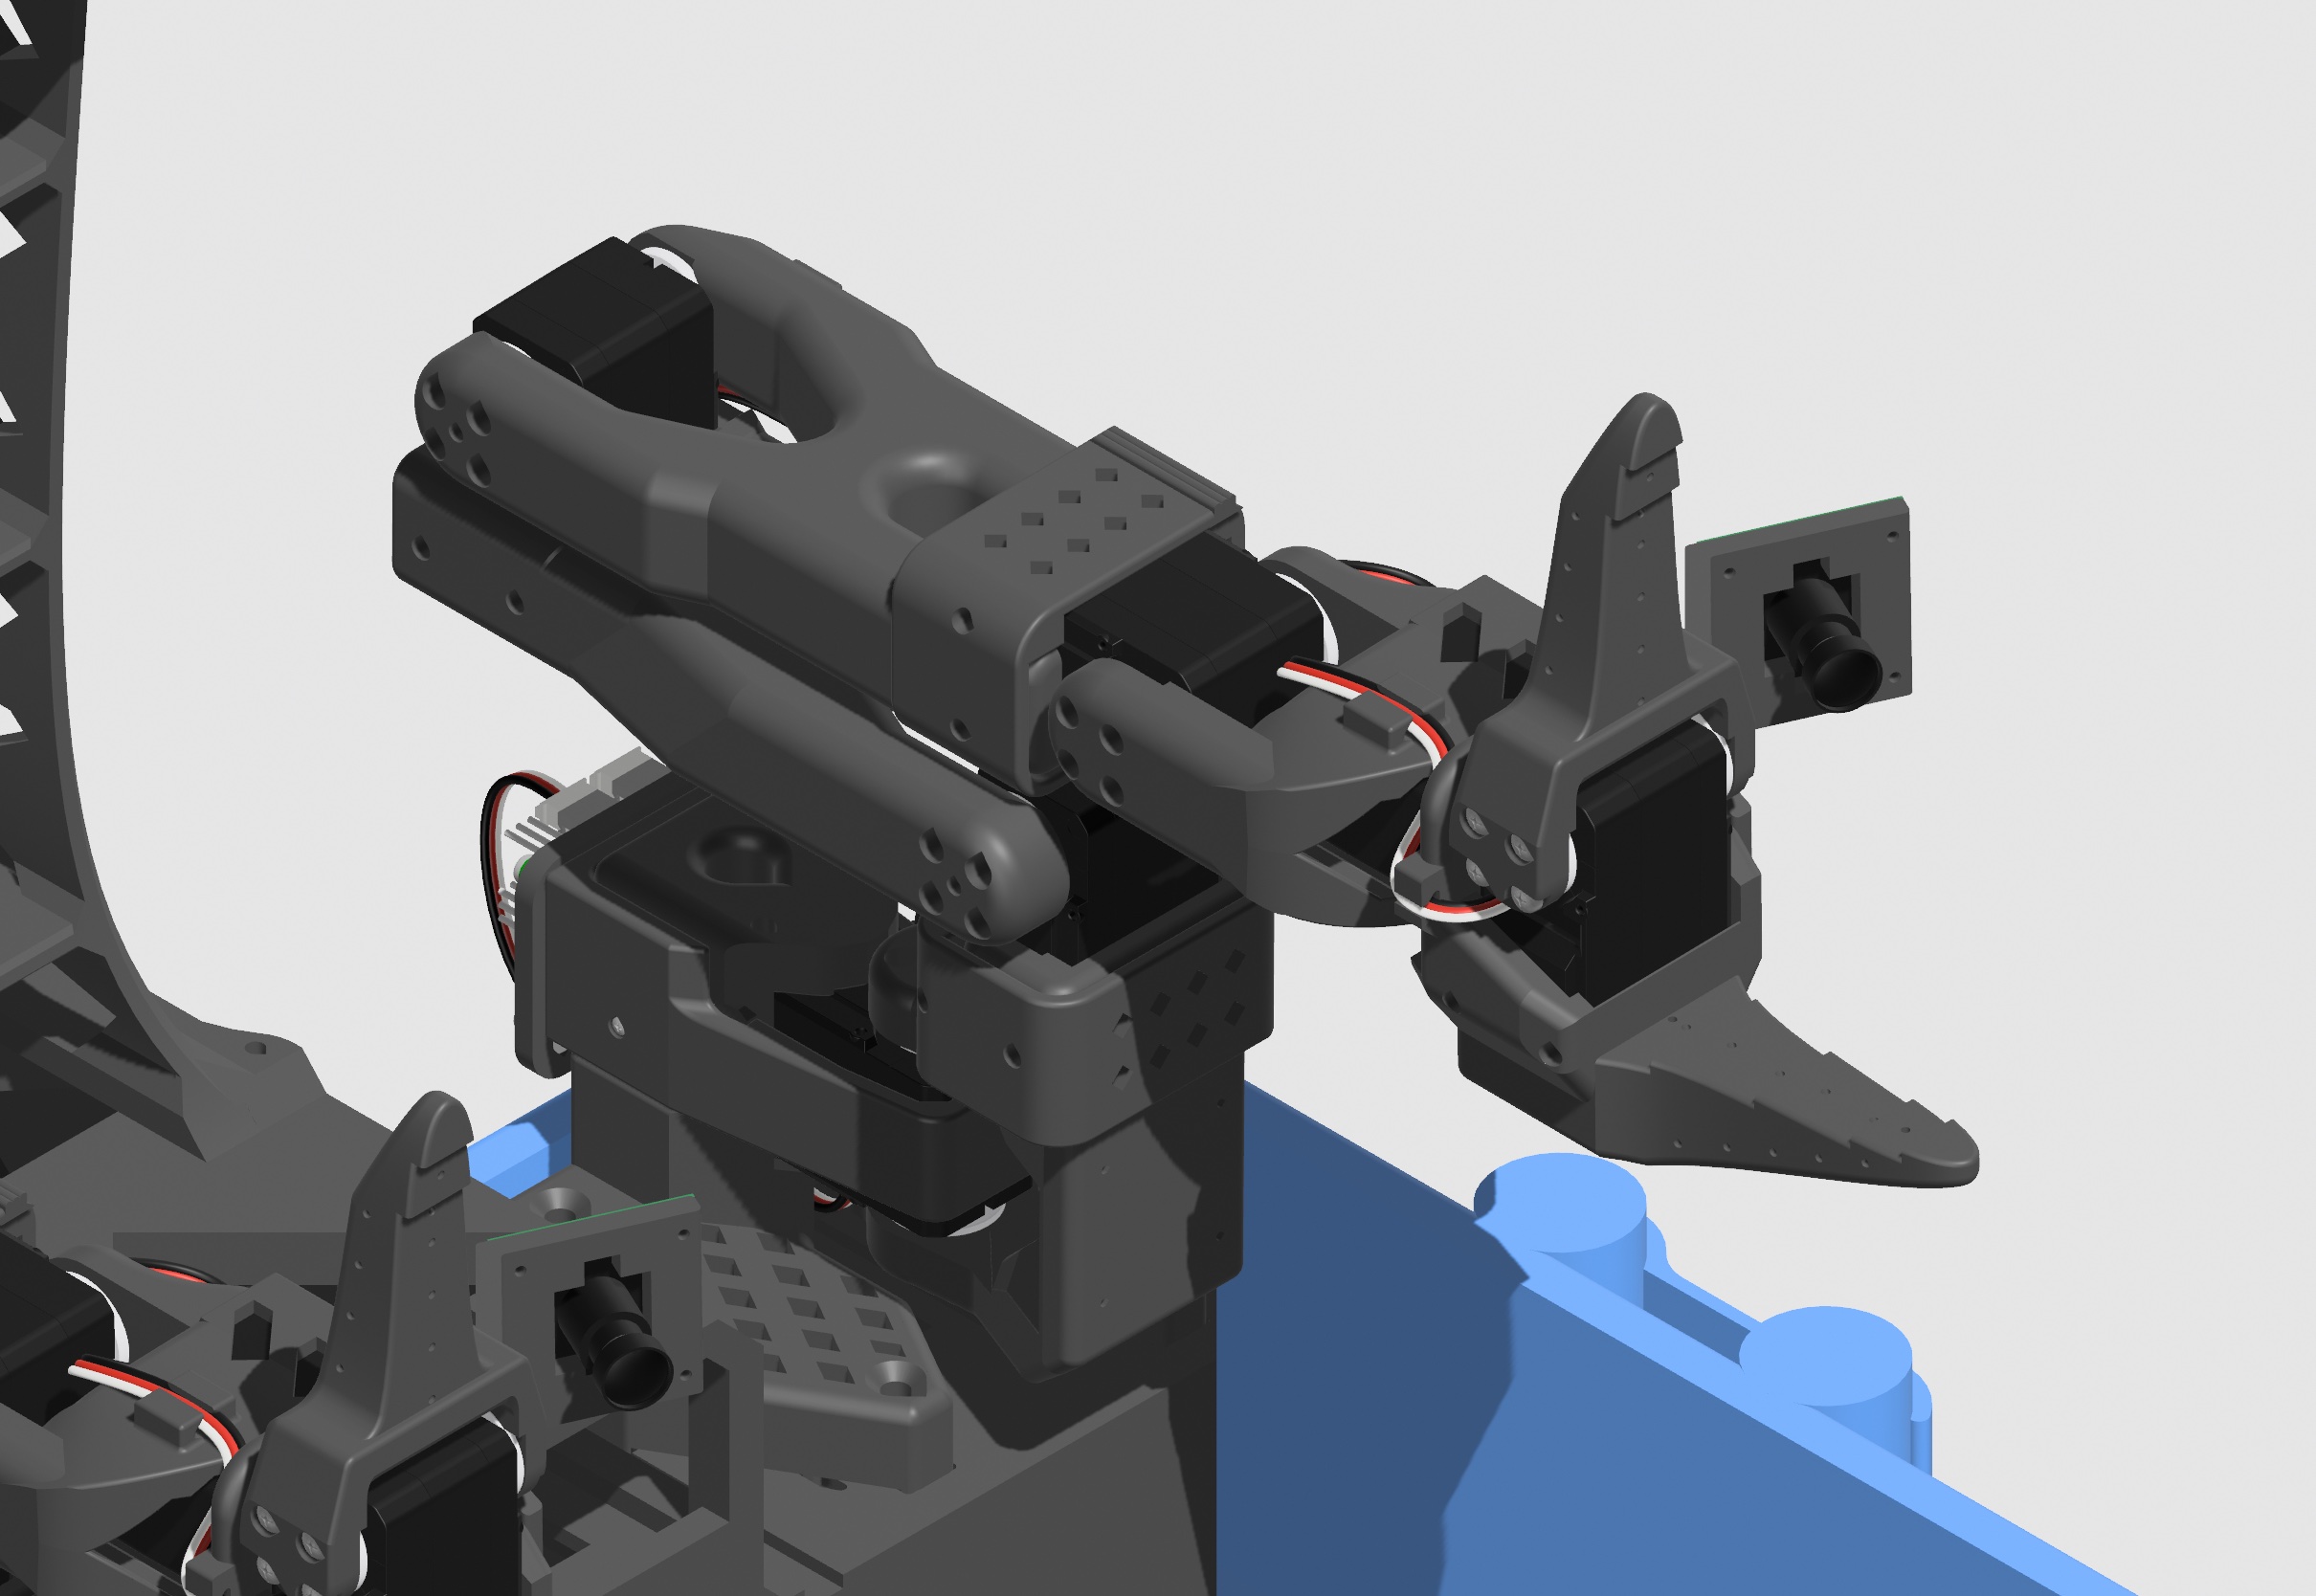
If you already have 2 assembled SO101 robotic arms with servos configured, please skip this.
Build 2 SO101 robotic arms following the SO101 step-by-step assembly instructions, making 2 identical follower arms, equipped with 2 sets of servos (all previously with ID 1-6) for the 2 servo driver boards.
Add the wrist camera following this installation guide.
If you have anti-slip pads, you can stick them onto the gripper.
1. Configure the Servos
| Quantity | Servo ID | Purpose | |
|---|---|---|---|
| Feetech STS3215-C018 servo | 3 | 7、8、9 | Omni-wheel chassis car |
| Feetech STS3215-C018 servo | 2 | 7、8 | Upper-limb kit-camera tower |
| 90CM servo extension cable | 2 | Connect the chassis car and camera tower to the servo driver board |
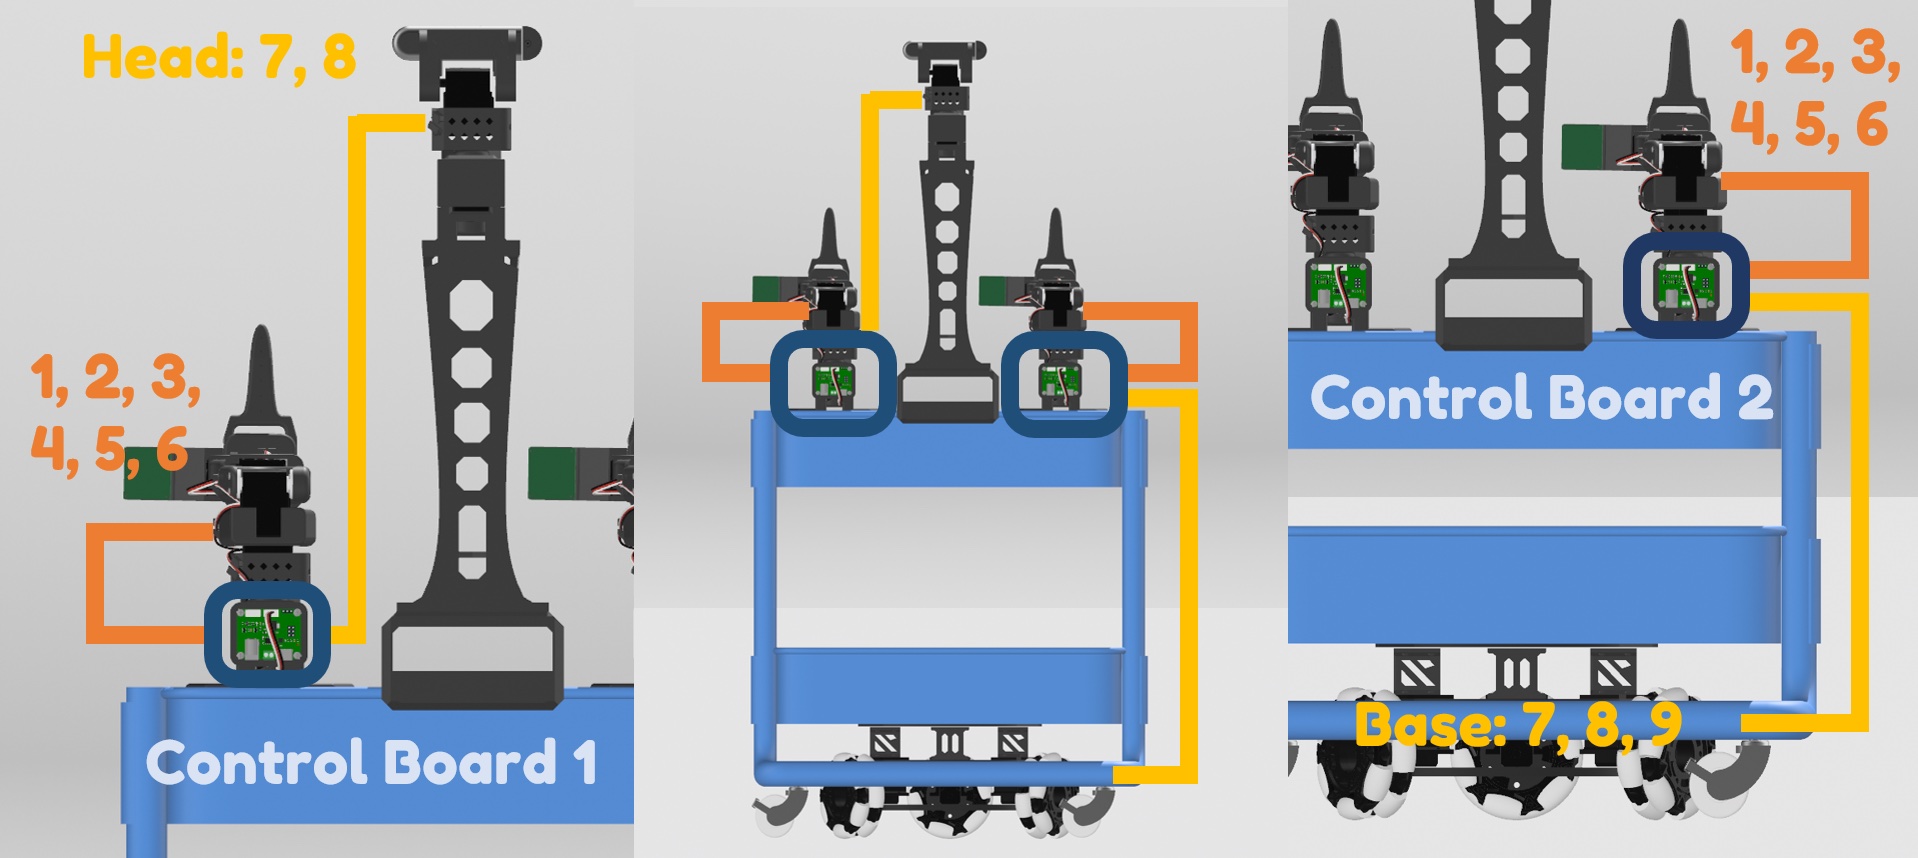
Because the official lerobot code repository currently does not support servo configurations other than the robotic arm, we use Bambot instead (it works on Windows and Mac; on Linux you need to first run sudo chmod 666 /dev/ttyACM0).
sudo chmod 666 /dev/ttyACM0Connect the servos you want to configure (one by one) to the servo driver board, and connect the servo driver board directly to your computer.
Navigate to the Bambot servo configuration page, establish a connection and scan your servos.

- Rename the servo IDs according to the instructions below.
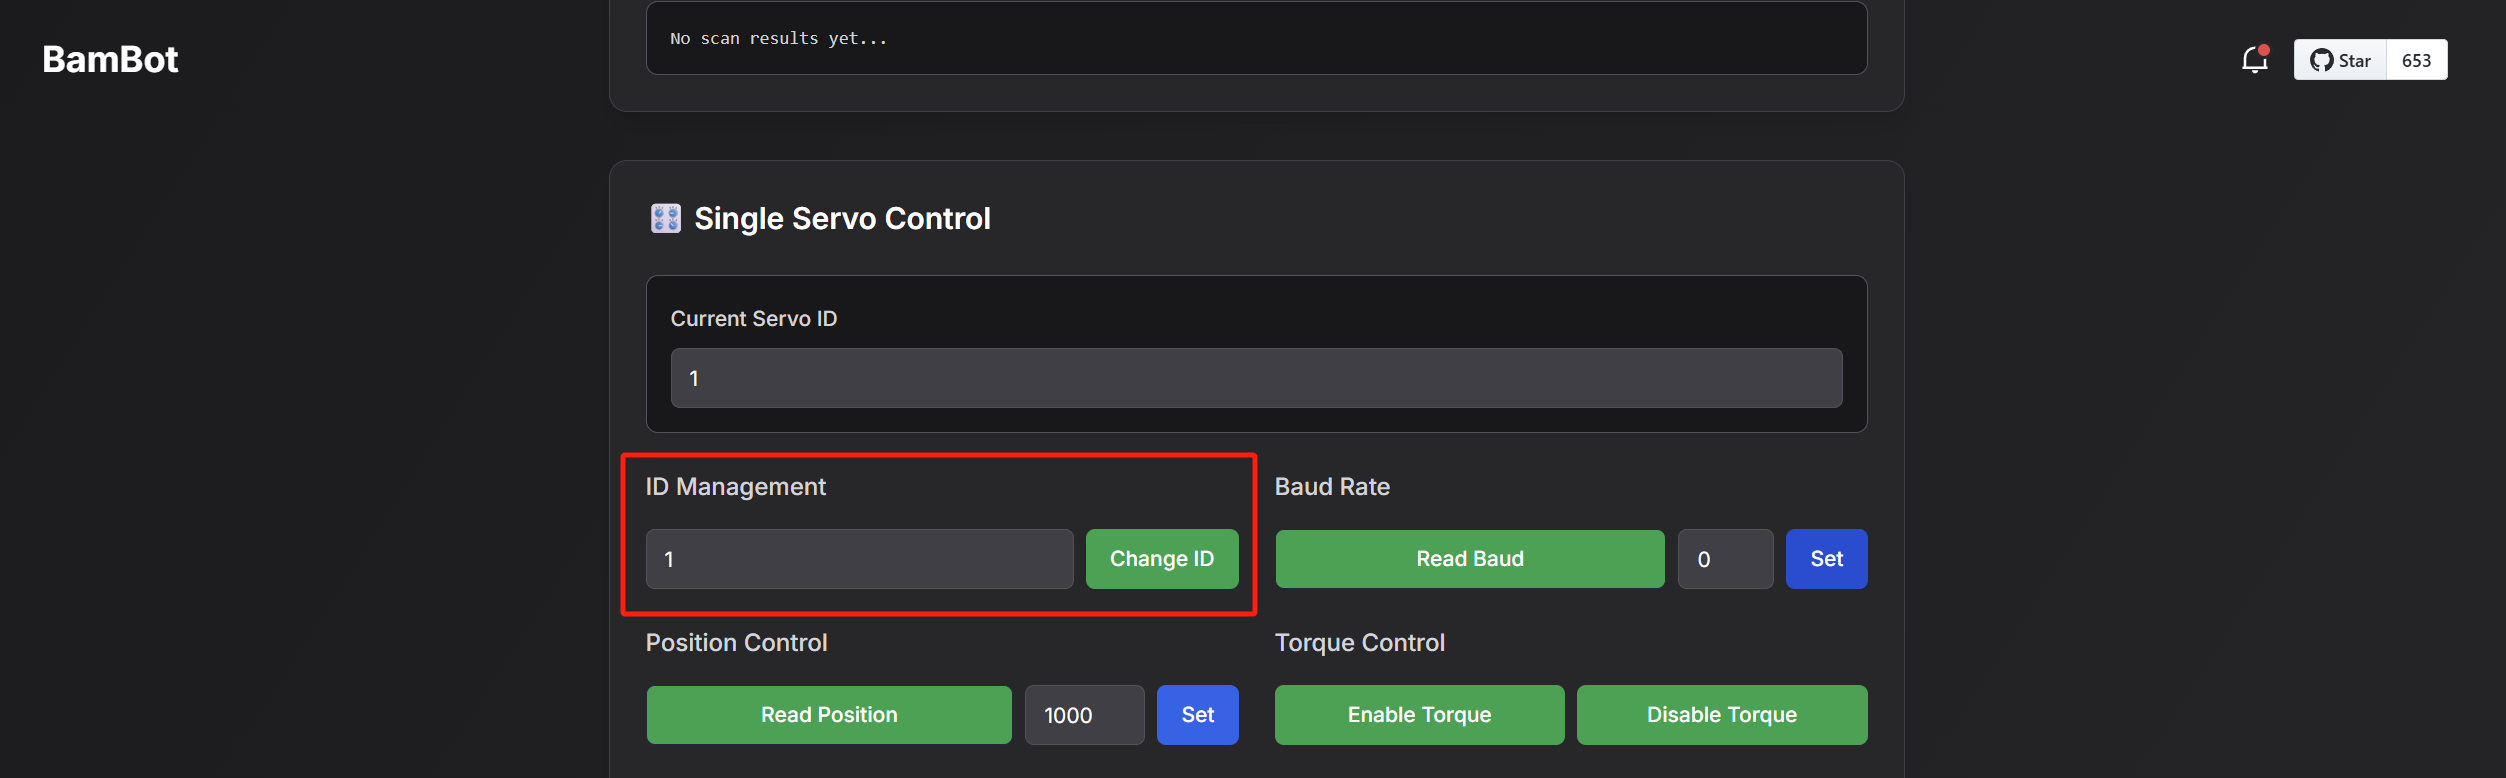
In addition to the SO101 robotic arms, you also need to configure two sets of servos for the 2 servo driver boards:
one set for the camera tower (servo IDs: 7, 8)
the other set for the omni-wheel chassis car (servo IDs: 7, 8, 9).
Tip: use a marker pen to write numbers on the servos, and distinguish the servos of different boards (e.g. L1-L8 and R1-R9).
🛒 Cart
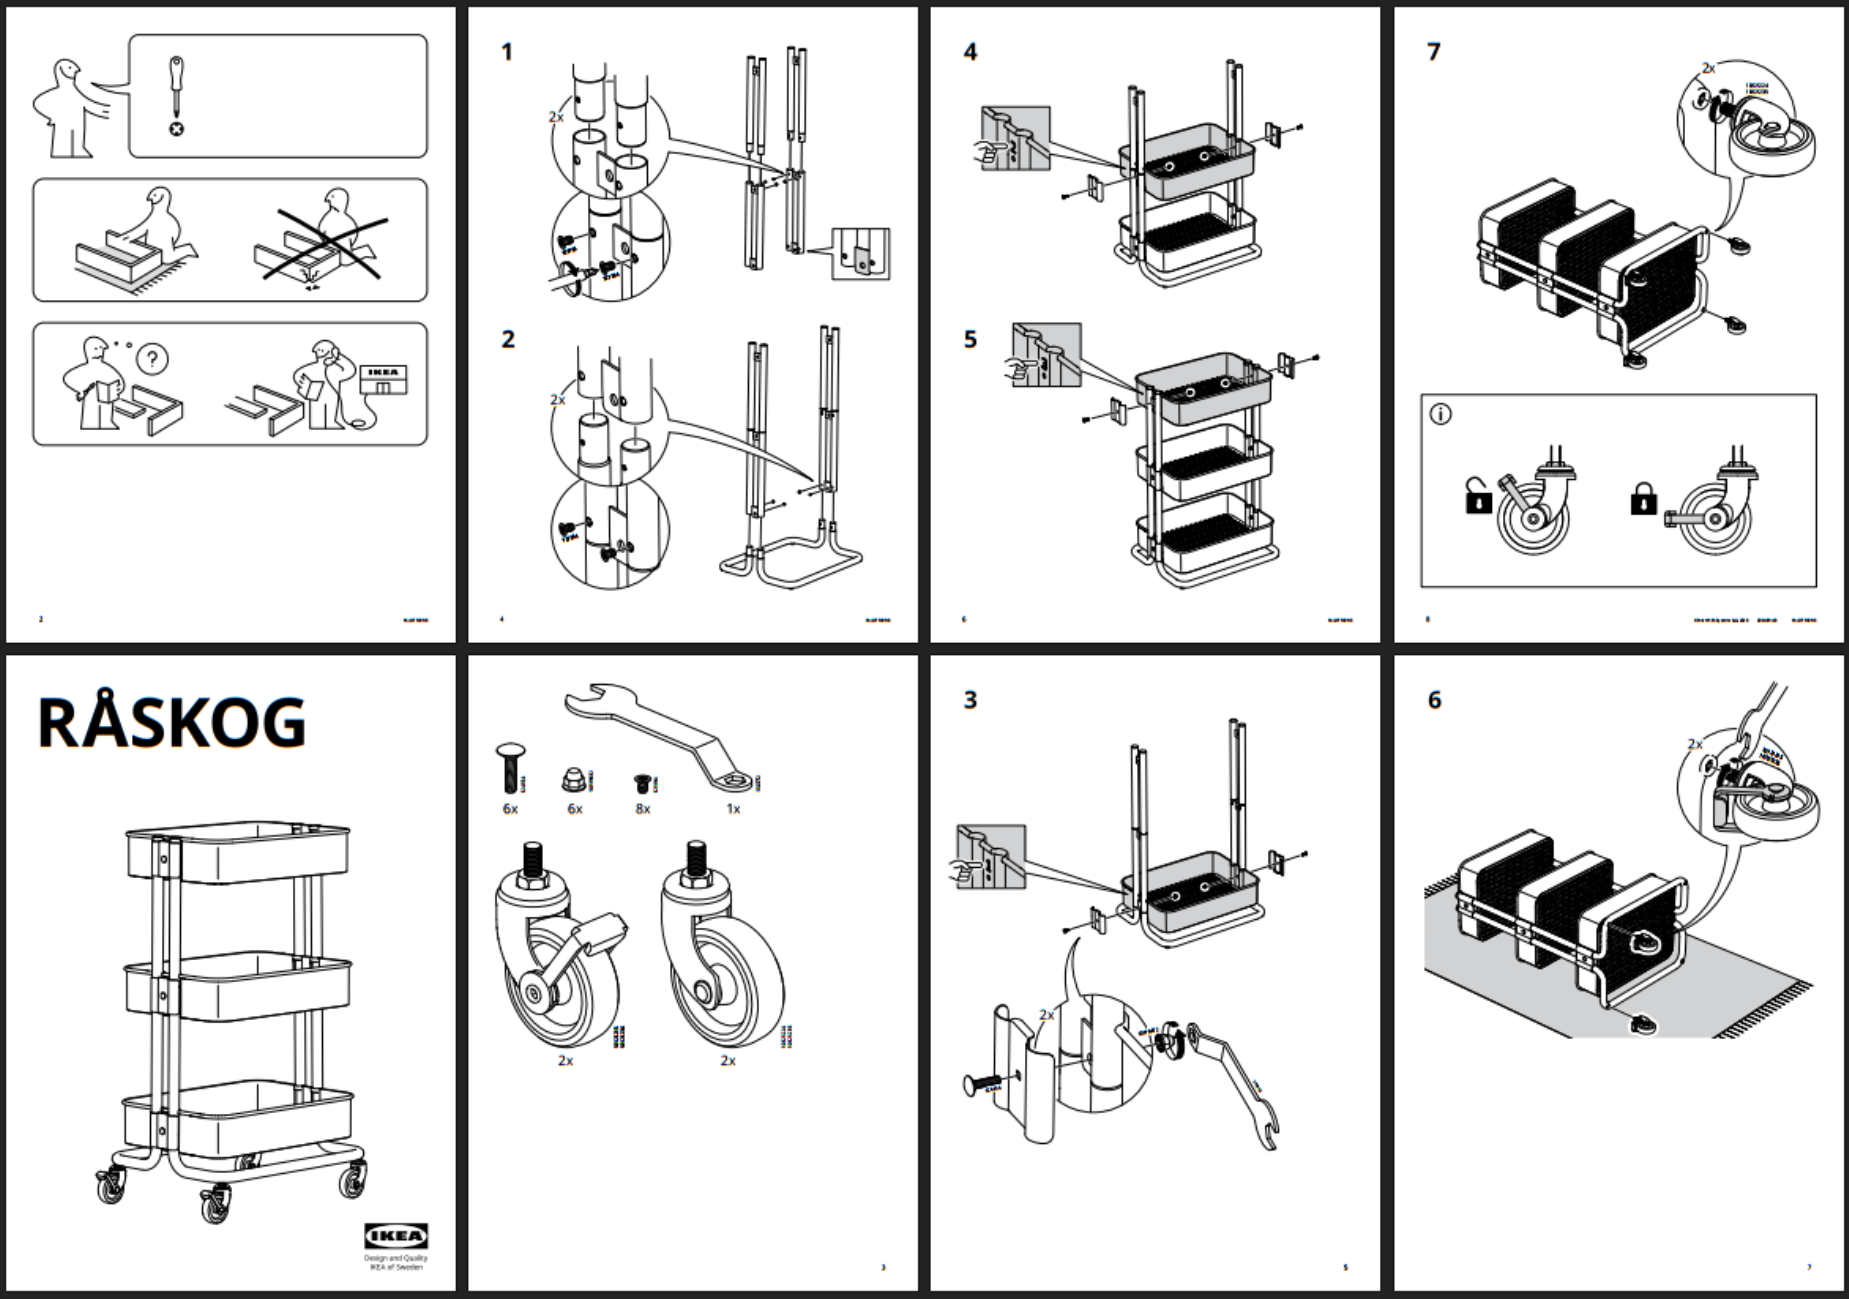
- In case you accidentally threw away the manual, here is a copy.
🧑🦼➡ Wheeled Base
If you already have a Lekiwi base, please remove the battery, servo brackets, etc. The bottom plate only needs 3 servos with wheels installed (keep the wiring).
Note
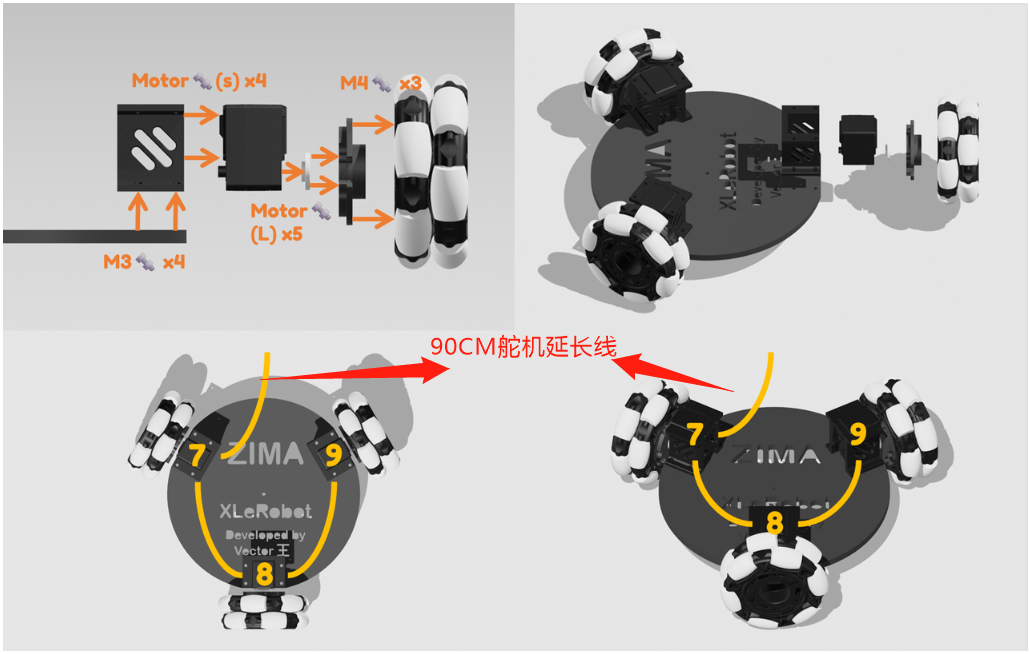
Do not choose the wrong board; each board has a specific order.
Install the omni wheels onto the board according to the figure above.
- The specific servo IDs should be installed accordingly.
Note that the omni wheel connectors require 3 M4 screws.
Wire the servos normally according to the tutorial; afterwards, do not connect the servo cables to the servo driver board — instead use the 90CM servo extension cable to connect to the servo driver board.
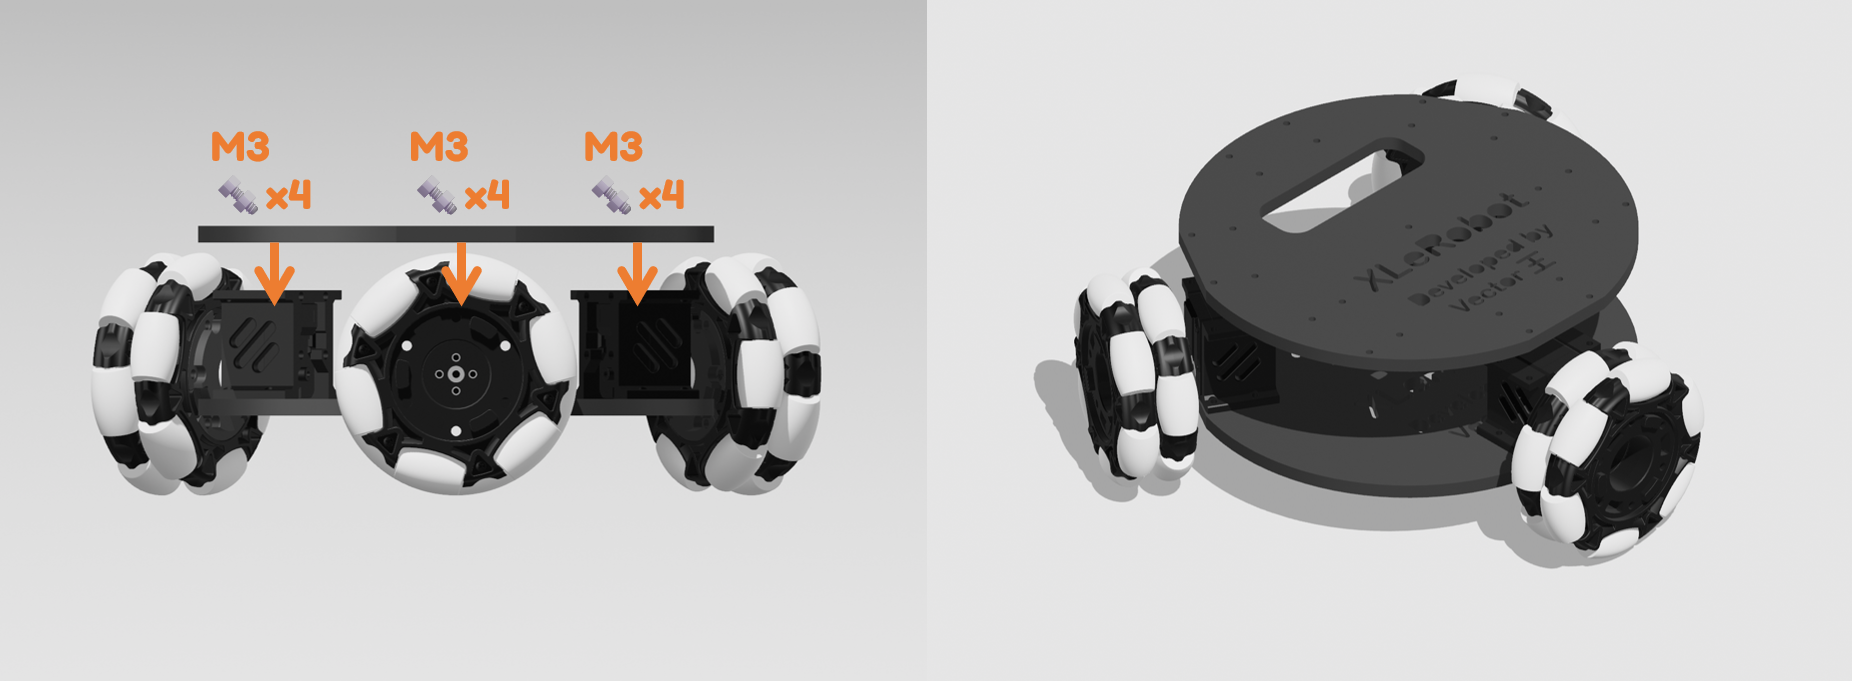
Install the top plate according to the figure above.
Leave the 90CM servo extension cable hanging; do not pull it out of the top plate hole for now.
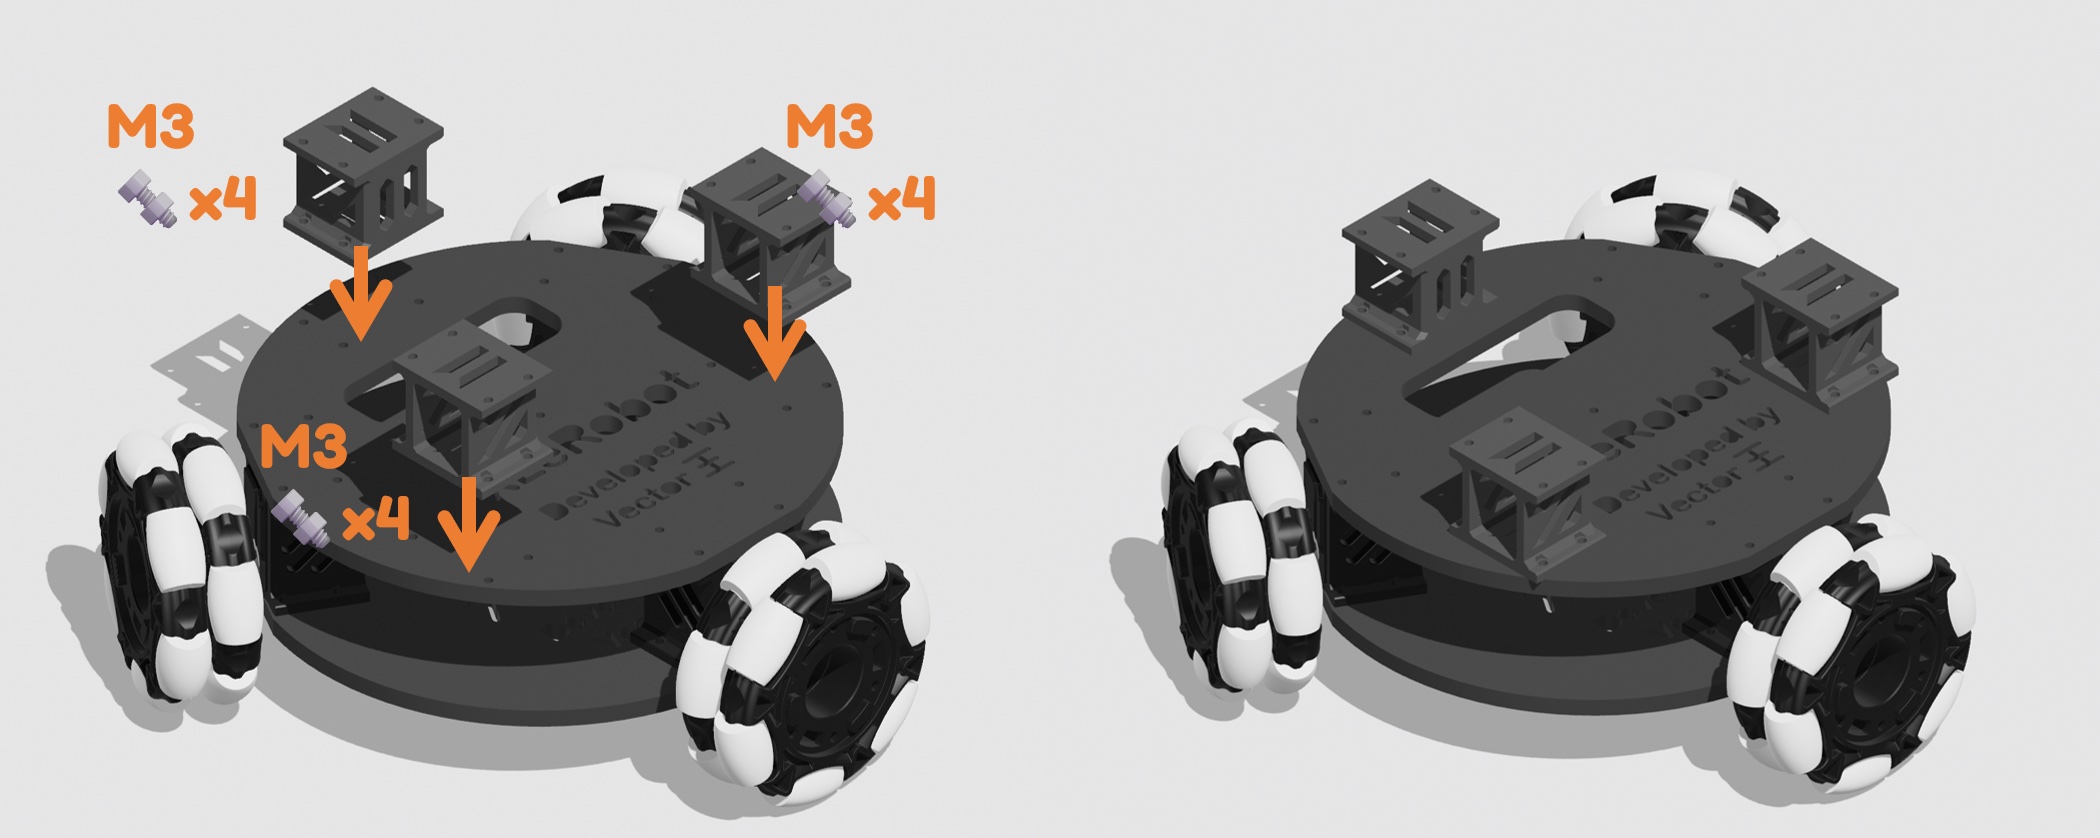
- Install 3 connectors (risers) on the top plate according to the figure above.
Tip
Place the Lekiwi base with connectors under the cart and see whether it puts enough pressure on the cart so that the cart's four wheels still touch the ground. If not, try modifying the connector's 3D model by slightly adjusting the Z-axis scale directly in the slicing software (keeping the X and Y axis scale unchanged) and reprinting it.
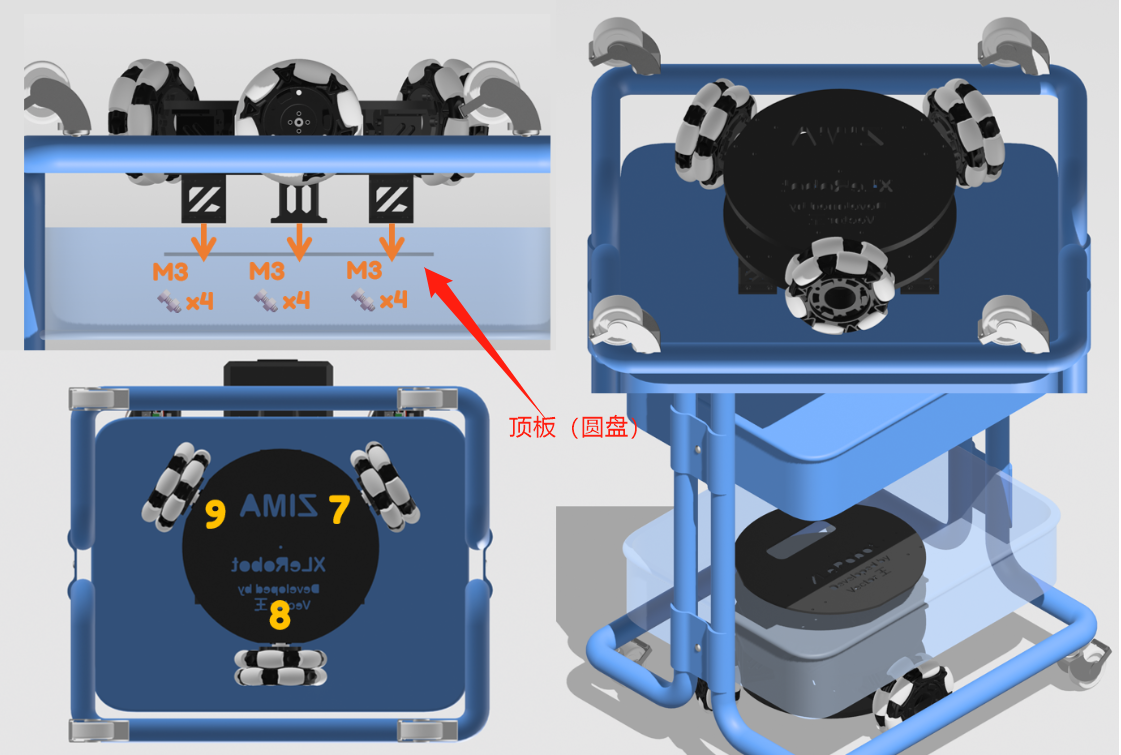
Tip
Flip the cart over to perform the following assembly.
Now install the Lekiwi base with connectors onto the bottom of the cart, with the thinner plate on the other side.
Refer to the figures to find the required assembly orientation based on the servo index.
Note
This new hardware version is compatible with the cart's metal mesh; all 12 M3 screws should fit in easily.
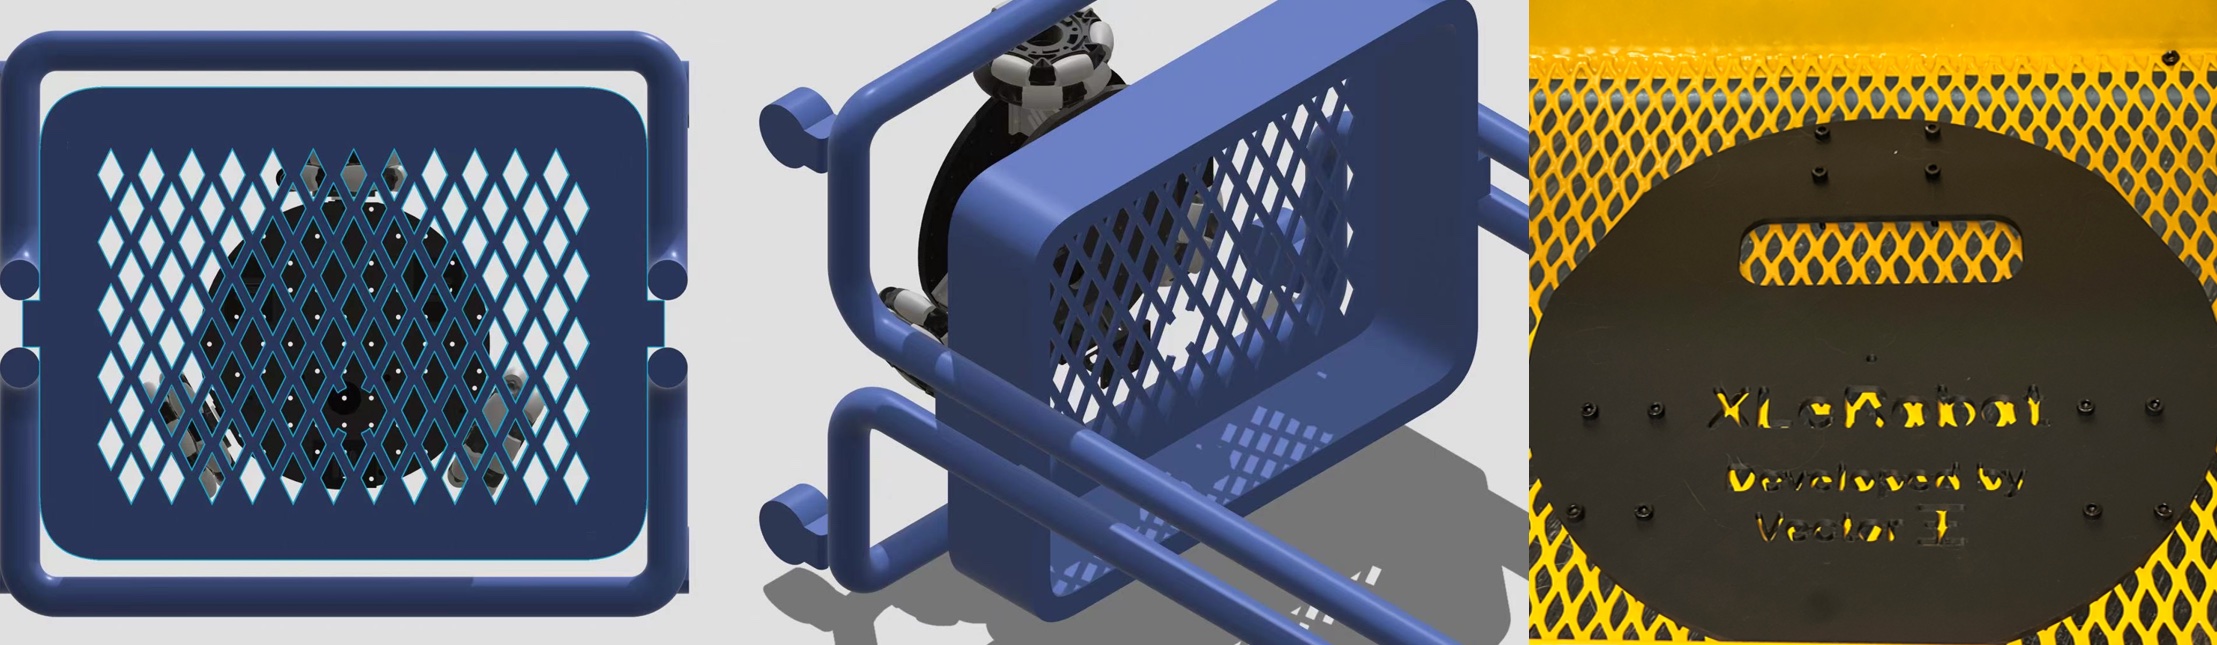
- Then, route the previously extended cables upward from below through the cart.
🦾 Robotic Arm Base
Top Base Assembly
14 M3*12 hex screws
4 M3*16 hex screws
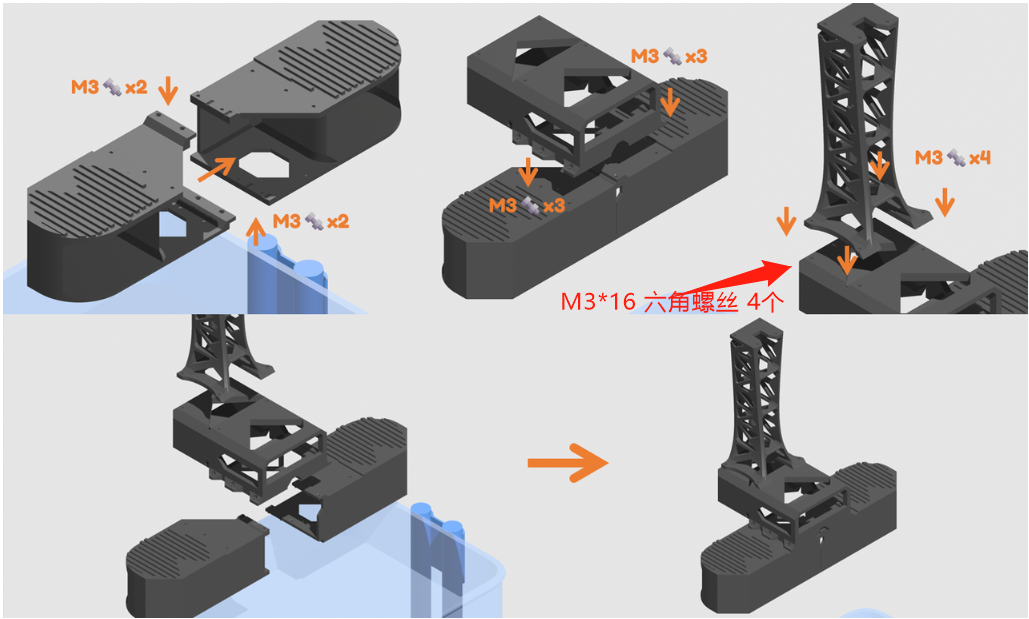
- Assembly is easier when the base is flipped over.
Head Assembly
①First use the 90CM servo extension cable (black and white alternating) and the servo cable (white, red and black alternating) plugged into servo No. 7.
②Use four M2*6 washer screws to fix the camera
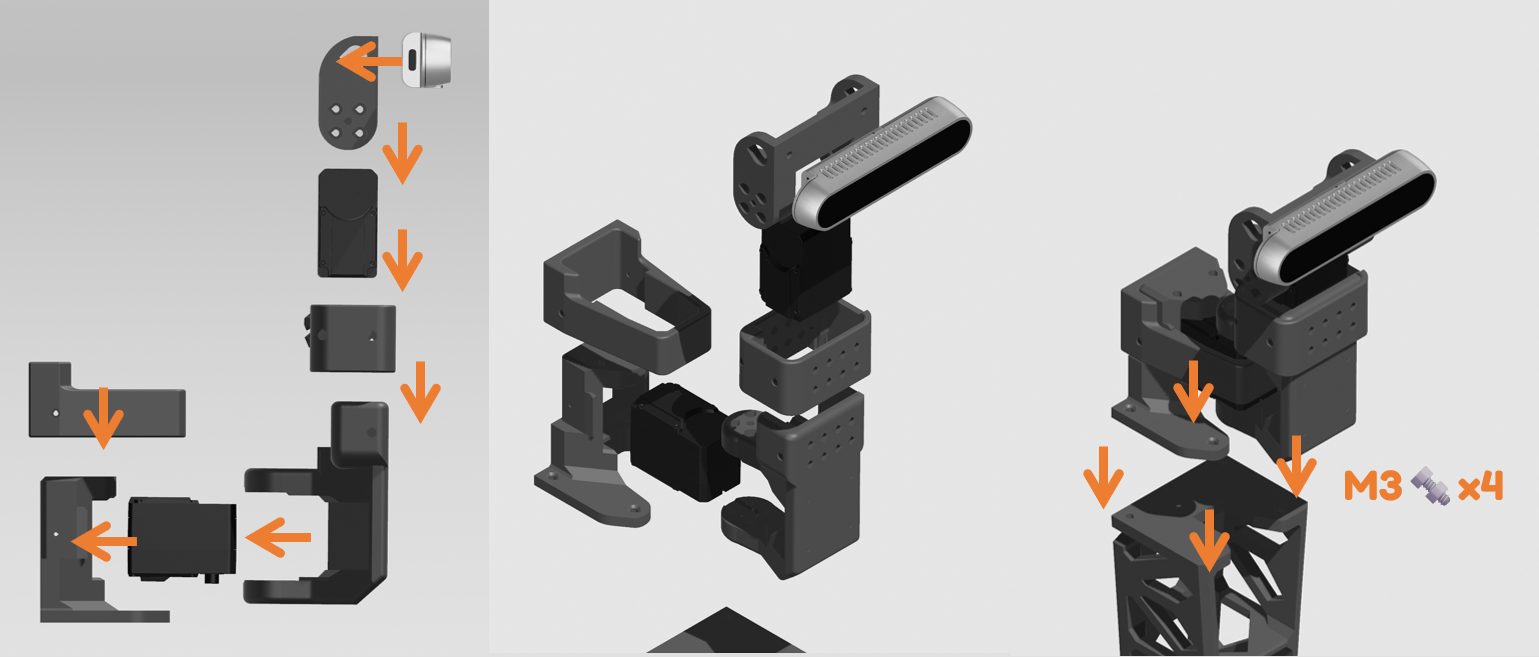
Note that when installing the servo horn, do not put a screw in the middle hole of the servo horn.
This should be the same as the first two steps of the SO101 robotic arm assembly.
🧵 Wiring
Important
Before clamping the top base onto the cart, complete all wiring and cable management for the top base, and place the Raspberry Pi into its enclosure.
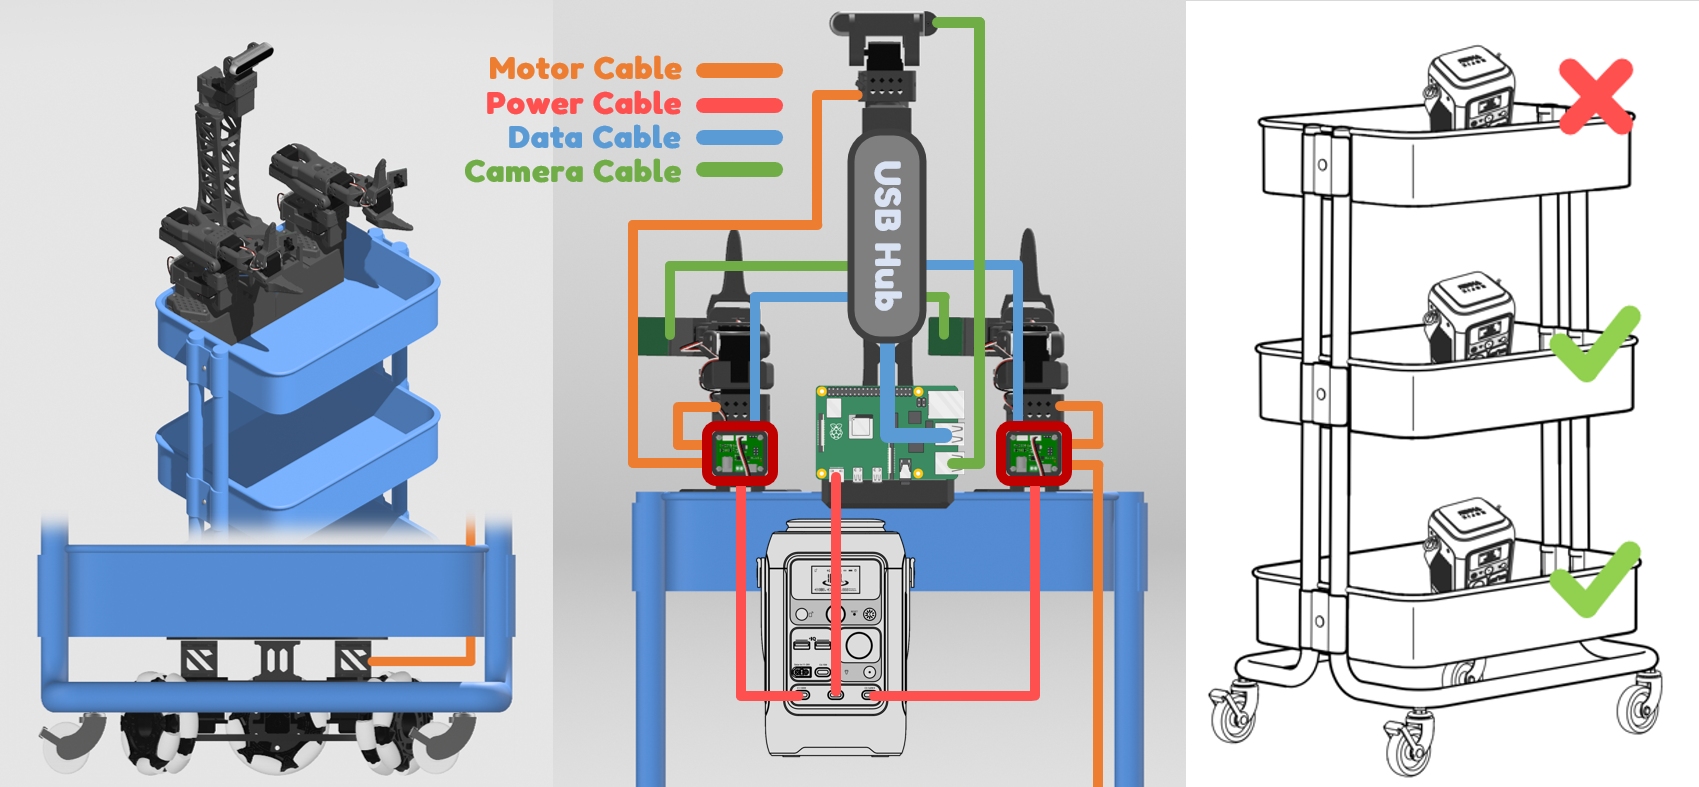
Connect the 90CM servo extension cable from the Lekiwi base to the left SO101 robotic arm (this makes the base and arm into a Lekiwi).
Connect 2 **USB-C to USB-A data cables ** from the 2 servo driver boards to the Raspberry Pi (the remaining 2 USB-A slots are for the cameras) or a Jetson mainboard.
Connect all 3 power cables: 2 USB-C to DC (12V) cables from the 2 servo driver boards and 1 USB-C to USB-C cable from the Raspberry Pi, to the PD fast-charging ports of the power supply. Each port provides up to 100W when charging simultaneously, which has been tested to be sufficient to support operation of the 12V version.
🔋 Placing the Battery 🛒
Place it anywhere on the middle or lower layer of the cart to keep the center of gravity low. The battery has a non-slip bottom and does not slide easily during normal operation.
Keep it upright for safety.
In case you also accidentally threw away the battery manual, here is a copy.
Important
To protect the servo driver boards, make sure to connect the power cables last. Always disconnect the power cables when plugging or unplugging other cables.
📸 Final Assembly
Installing the Base into the Cart
Important
Before clamping the top base onto the cart, complete all wiring and cable management for the top base, and place the Raspberry Pi into its enclosure.
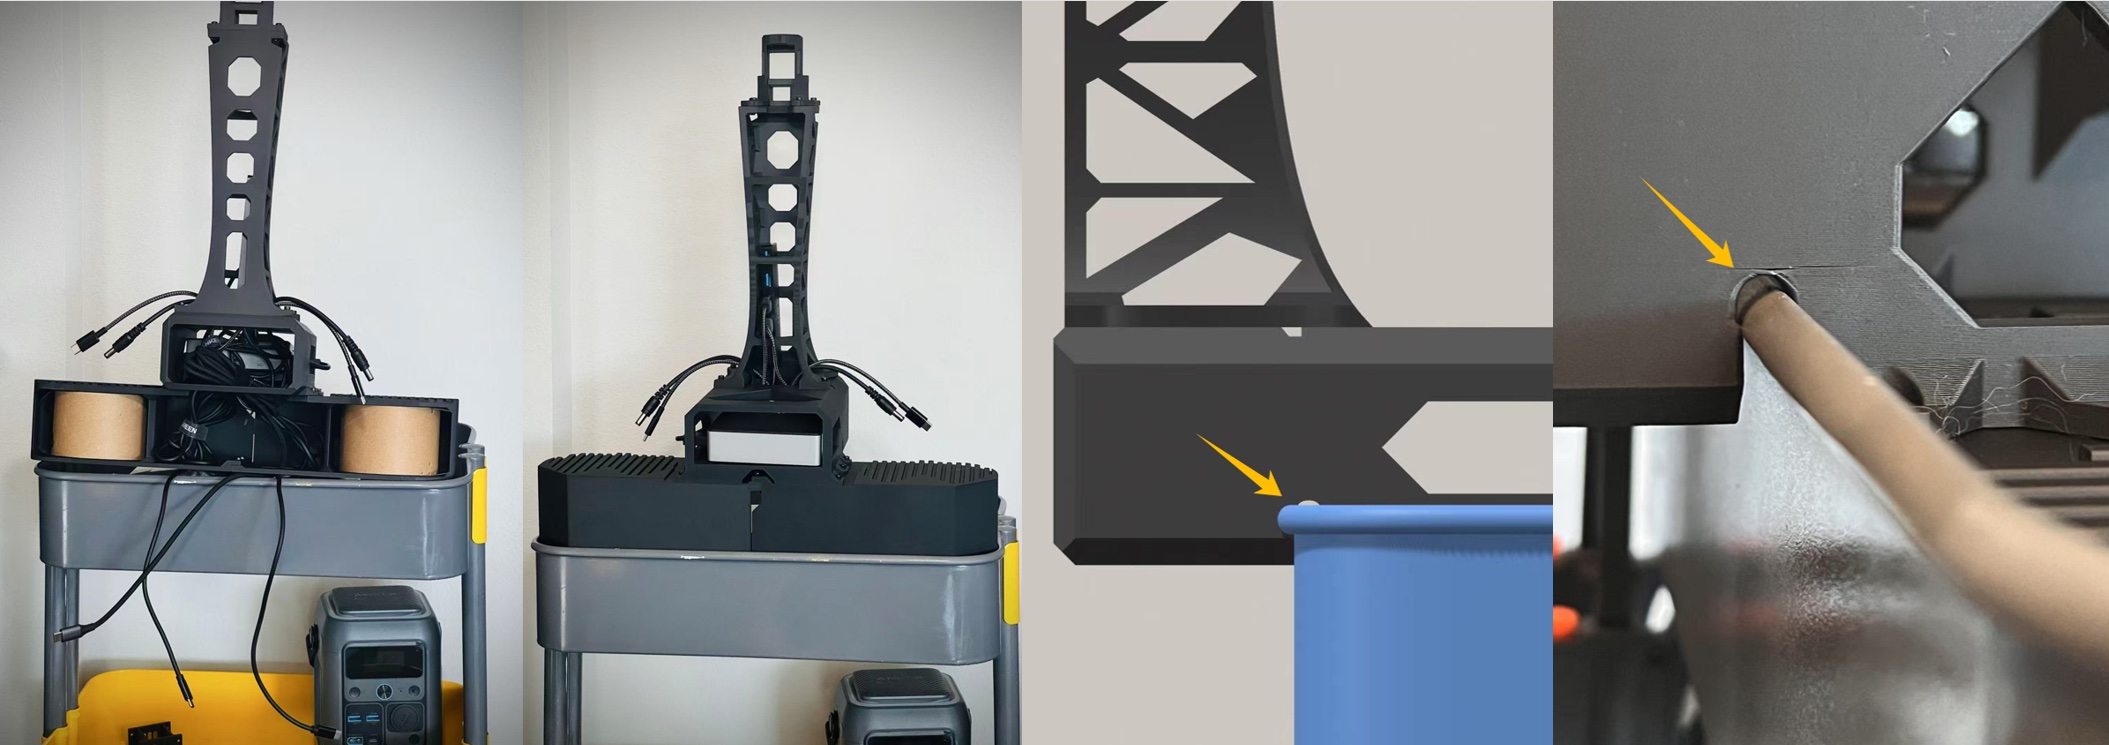
Be careful not to damage the enclosure when pushing the cart edge into the enclosure socket.
To make testing easier, the SO101 robotic arms are clamped directly onto the cart. Position the robotic arm base at the two corners of the top layer of the cart, then fix it with F-type clamps.
If you have a Bambu Lab filament cardboard spool, don't forget to put it inside to provide stable structural support.
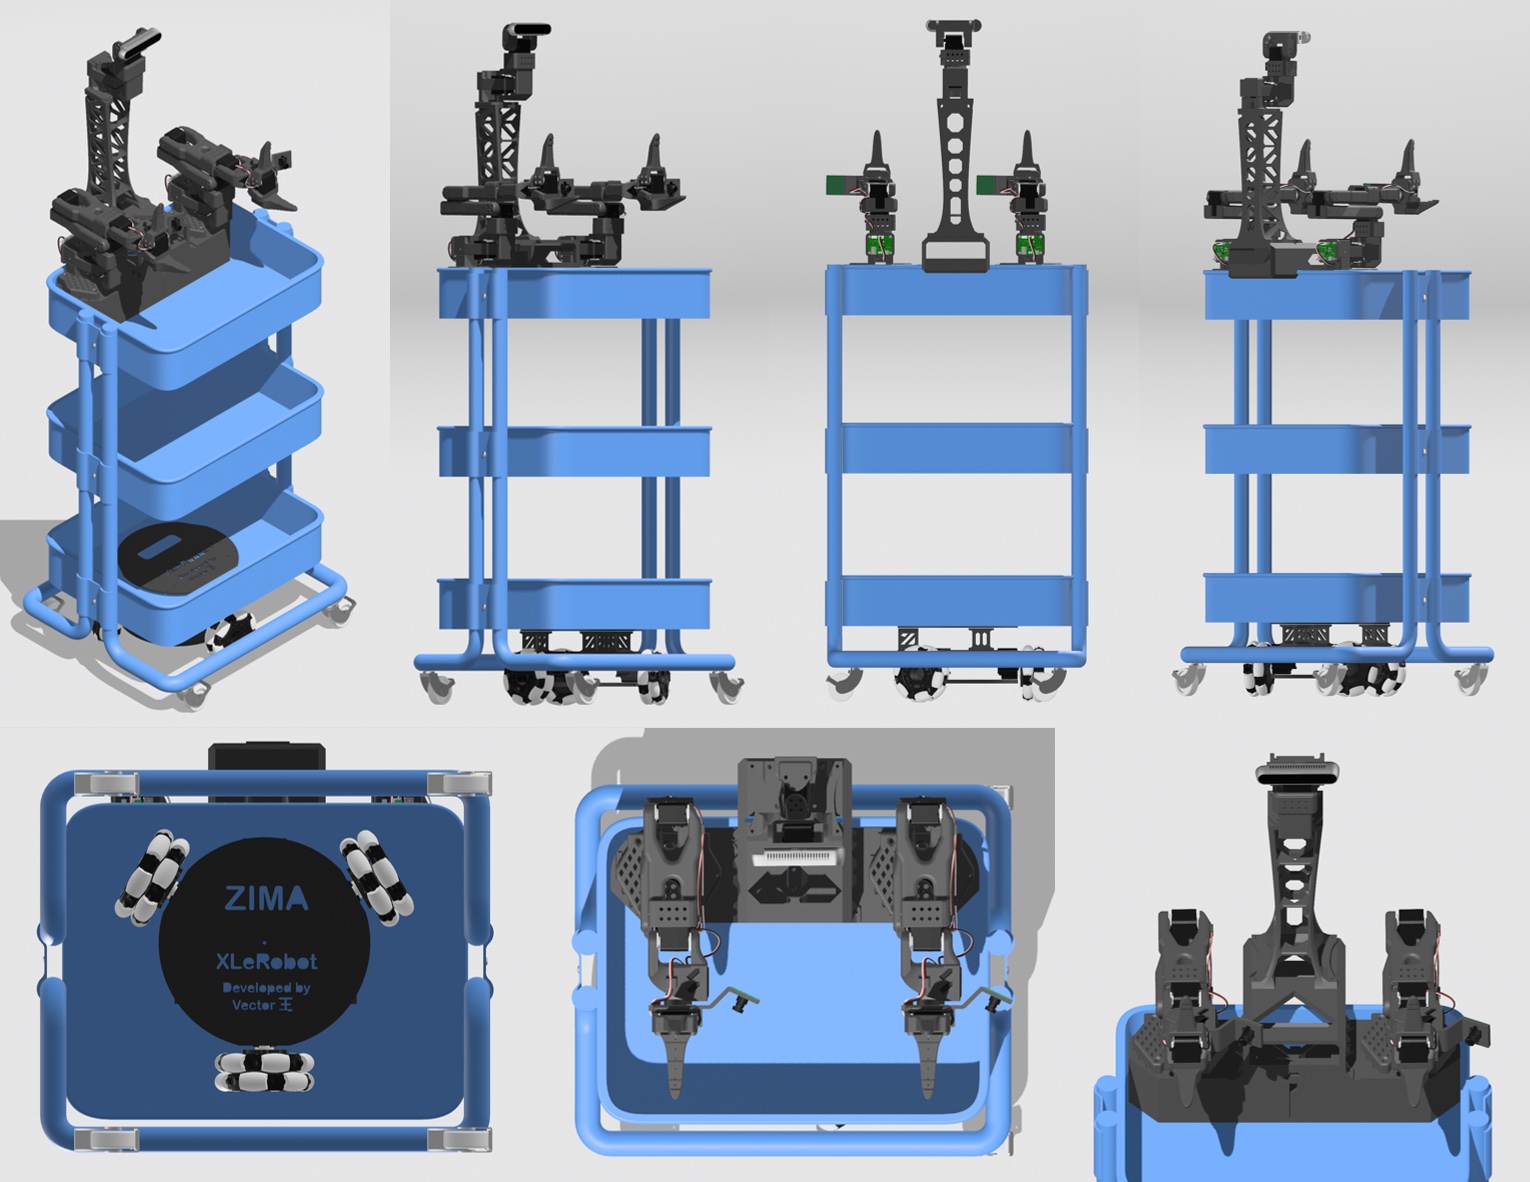
After completing these steps, the XLeRobot should be physically well assembled and ready to do some housework.
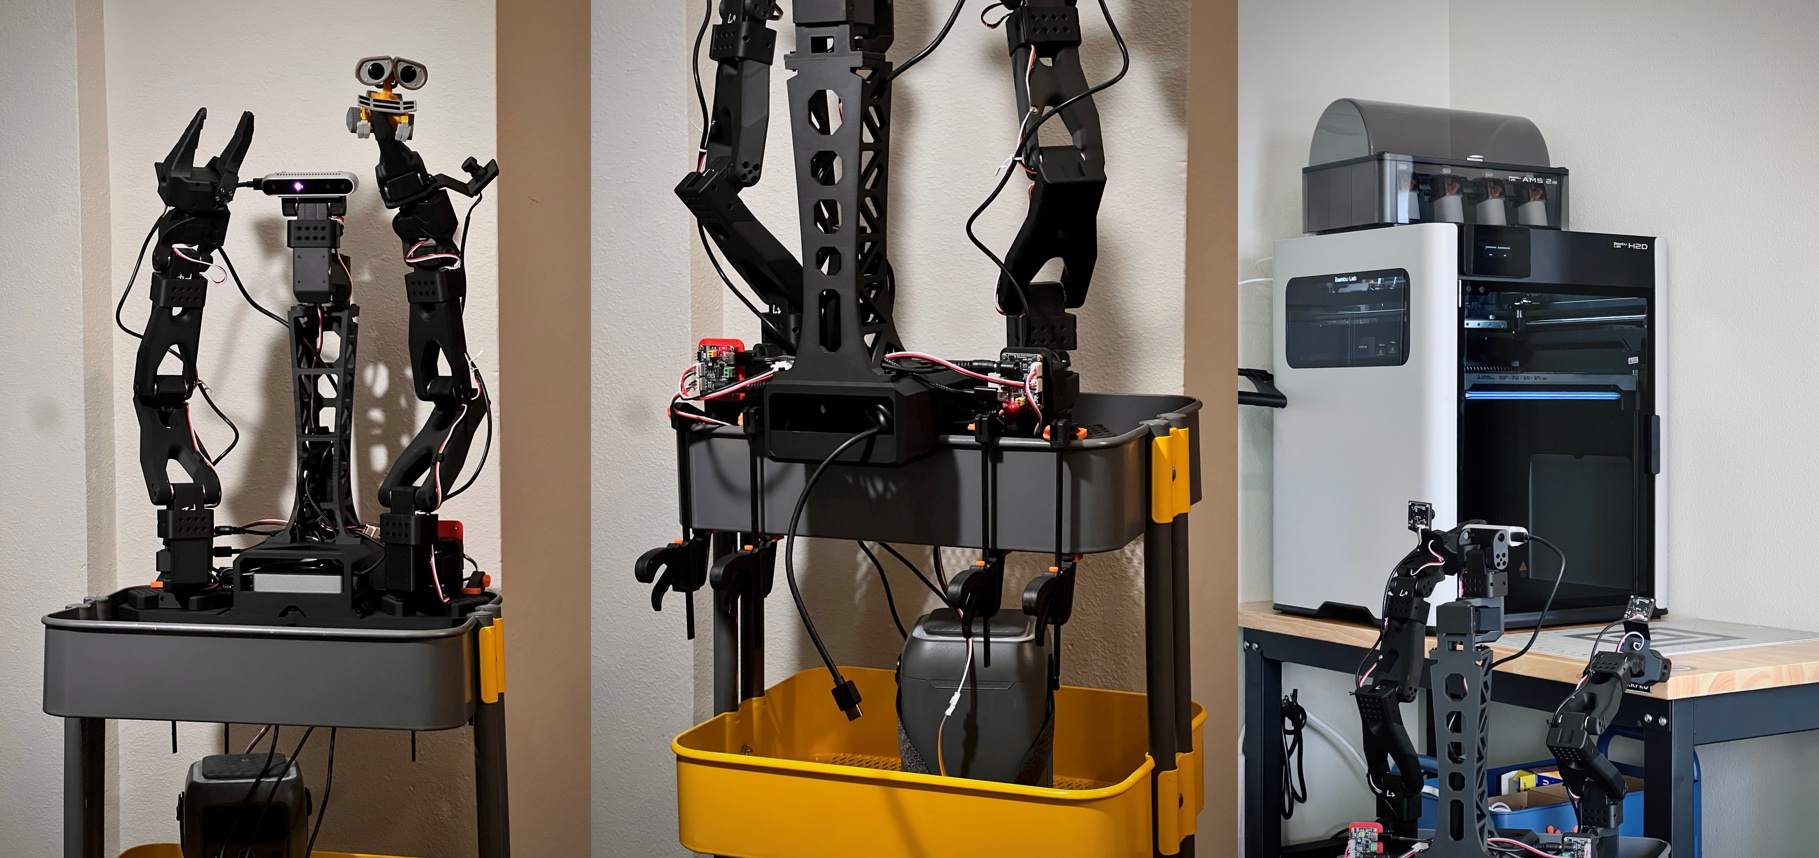
Important
Once the XLeRobot is fully assembled, do not push it around like a cart, as this may damage the servo gears. Instead, lift the robot (~12kg) when you need to move it manually.