

PWM Desktop Host Software (Tkinter GUI)
Run the following commands in the repository's
AmazingHand-PWM/directory.
This page is the desktop control tutorial for the PWM servo version. For web control, see PWM web control; for wiring, see PWM wiring; for firmware flashing, see PWM quick start.
Applies to: ESP32-S3 + 8-channel PWM servos (differential drive). For firmware flashing, see PWM quick start; for the protocol and commands, see PWM protocol and calibration.
1. Running options
| Method | Requirements | Best for |
|---|---|---|
| Run from source (recommended) | 64-bit Python 3.12 + pyserial | All features, including hand tracking |
| Package your own exe | PyInstaller | Distribution without installing Python (see Section 7) |
2. Running from source
Install dependencies
Run in the module root directory (AmazingHand-PWM/):
# Basic dependencies (pyserial)
pip install -r tools/requirements.txt

# Run this only if you need hand tracking (automatically creates tools/tracking_env and installs mediapipe)
tools/setup_tracking.bat
mediapipe 0.10.14 only ships a 64-bit Windows wheel, so you must use 64-bit Python 3.12.
Launch the GUI
# Any Python with pyserial
python tools/hand_gui.py

# Or use the tracking environment (includes mediapipe)
tools/tracking_env/Scripts/python tools/hand_gui.py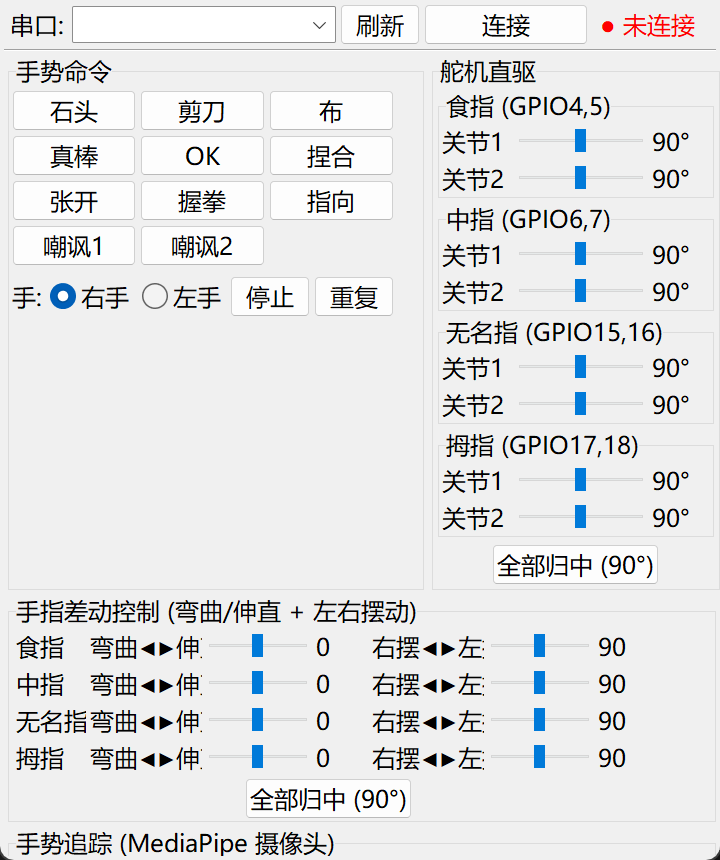
Using the GUI
Select the serial port: choose the ESP32's COM port from the drop-down at the top (check Device Manager).
Click "Connect": the status light turns green, the log shows "connected", and a NOP link test is sent automatically.
Gesture commands: click "Rock / Scissors / Paper / Thumbs Up / OK / Pinch / Point / Open / Fist" and the dexterous hand performs the gesture.
Left/right hand: tick "Right hand" / "Left hand" to switch (the thumb's mirror direction differs).
Direct servo control: drag the 8 sliders to control each servo's angle in real time (0–180°).
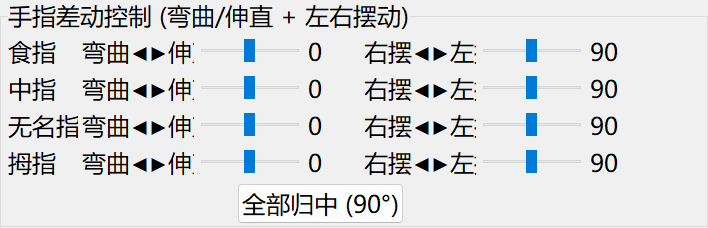
Finger differential control: two sliders per finger—
- Bend ◀▶ Extend: bend or extend the finger (range -70 to +70).
- Swing right ◀▶ Swing left: swing the finger left/right (range 60 to 120, 90 = neutral).
These two sliders are control axes, not two servos. The program combines them into the angles of the finger's two servos: the same-direction component produces splay, the opposite-direction component produces flexion/extension.
Repeat / Stop: repeat the last gesture / abort immediately.
Communication log: shows sent and received frames and responses in real time at the bottom.
Built-in hand tracking in the GUI
The GUI includes a hand-tracking panel (the camera follows your hand's motion):
- After connecting the serial port, scroll to the "Hand Tracking (MediaPipe camera)" panel.
- Select the camera index (default 0) and click "Start Tracking".
- Put your hand in the camera view; the dexterous hand follows the bend/extend motion.
Tracking requires mediapipe to be installed by
tools/setup_tracking.bat; only the GUI launched from source has the tracking feature.
3. Command-line testing (tools/serial_test.py)
Run in the module root directory:
# Link test (confirm the connection works first)
python tools/serial_test.py COM3 nop

# Gestures
python tools/serial_test.py COM3 rock         # Rock
python tools/serial_test.py COM3 thumbs_up    # Thumbs up
python tools/serial_test.py COM3 index        # Point
python tools/serial_test.py COM3 open         # Open
python tools/serial_test.py COM3 close        # Fist

# Single-servo direct drive
python tools/serial_test.py COM3 servo 1 90   # Servo 1 → 90°

# Center all
python tools/serial_test.py COM3 mid

# Set left/right hand
python tools/serial_test.py COM3 hand L
python tools/serial_test.py COM3 hand R

# Sweep / self-test
python tools/serial_test.py COM3 sweep 1      # Sweep servo 1
python tools/serial_test.py COM3 test         # Test every servo one by one
4. Manual testing with a serial tool (optional)
You can verify the link without the host software by sending hexadecimal frames directly with a serial tool.
CoolTerm (Windows / macOS / Linux):
Options→ baud rate 115200, 8N1.Connection→Send String→ selectHex.- Send
AA 01 00 01(Rock); the response area should showBB 01 00 01(ACK) andBB 01 10 11(complete).
Linux / macOS command line:
# Linux
stty -F /dev/ttyUSB0 115200
printf '\xAA\x01\x00\x01' > /dev/ttyUSB0

# macOS
stty -f /dev/cu.usbserial-0001 115200
printf '\xAA\x01\x00\x01' > /dev/cu.usbserial-0001
For the frame format, checksum and all commands, see PWM protocol and calibration.
5. Python control script (custom development)
import time
import serial

PORT, BAUD = "COM3", 115200          # On Linux/macOS use /dev/ttyUSB0, /dev/cu.usbserial-*

def frame(cmd, data=b""):
    checksum = cmd ^ len(data)
    for byte in data:
        checksum ^= byte
    return bytes([0xAA, cmd, len(data)]) + data + bytes([checksum & 0xFF])

ser = serial.Serial(PORT, BAUD, timeout=1)
time.sleep(1)                        # Wait for the ESP32 to finish resetting

ser.write(frame(0x00))               # NOP link test
ser.write(frame(0x01))               # Rock
time.sleep(0.5)
ser.write(frame(0xF0, bytes([90] * 8)))  # All 8 servos to 90°
ser.close()
The response frame is BB CMD STATUS CKSUM; STATUS=0x00 means accepted and 0x10 means the gesture is complete. For the full command table and direct-drive/left-right hand examples, see PWM protocol and calibration.
6. FAQ
| Symptom | Solution |
|---|---|
| Servos do not move | Check the power supply (dedicated 5V 3A), the COM port, and the wiring |
| No response / servos jerk after opening the serial port | Confirm the baud rate is 115200; the GUI sends a NOP handshake first when connecting |
| No camera image | Grant camera permission (Settings → Privacy → Camera) |
| Hand pose is mirrored | Tick the opposite left/right hand |
| Tracking does not respond | Make sure you launched with the Python from tools\tracking_env and that mediapipe installed successfully |
7. Packaging your own exe (optional)
pip install pyinstaller
python -m PyInstaller --onefile --noconsole --name "AmazingHand控制台" tools/hand_gui.py
The packaged build does not include hand tracking (mediapipe resources are fairly large); use the source method if you need tracking.
See PWM protocol and calibration for the full protocol and command reference.