

SCS0009 Desktop Host Software (GUI and CLI)
This page is the desktop control tutorial for the SCS0009 serial bus version. For web control, see SCS0009 web control; for hardware wiring, see SCS0009 wiring.
Quick start
- Install Python 3.10+ and the dependencies: Installation.
- Connect the bus driver board and confirm the serial port: Environment requirements.
- Run the GUI:
amazing-hand-guiorpython amazing_hand_gui.py. - Check the left/right hand, angles and middle position as described in Calibration.
- Use the per-finger sliders, preset poses and sequences to make it move.
AmazingHand Python control tool (for left and right hands)
A GUI and command-line tool written in Python that drives 8 Feetech SCS0009 servos through a serial bus servo driver board to control Pollen Robotics' AmazingHand dexterous hand.
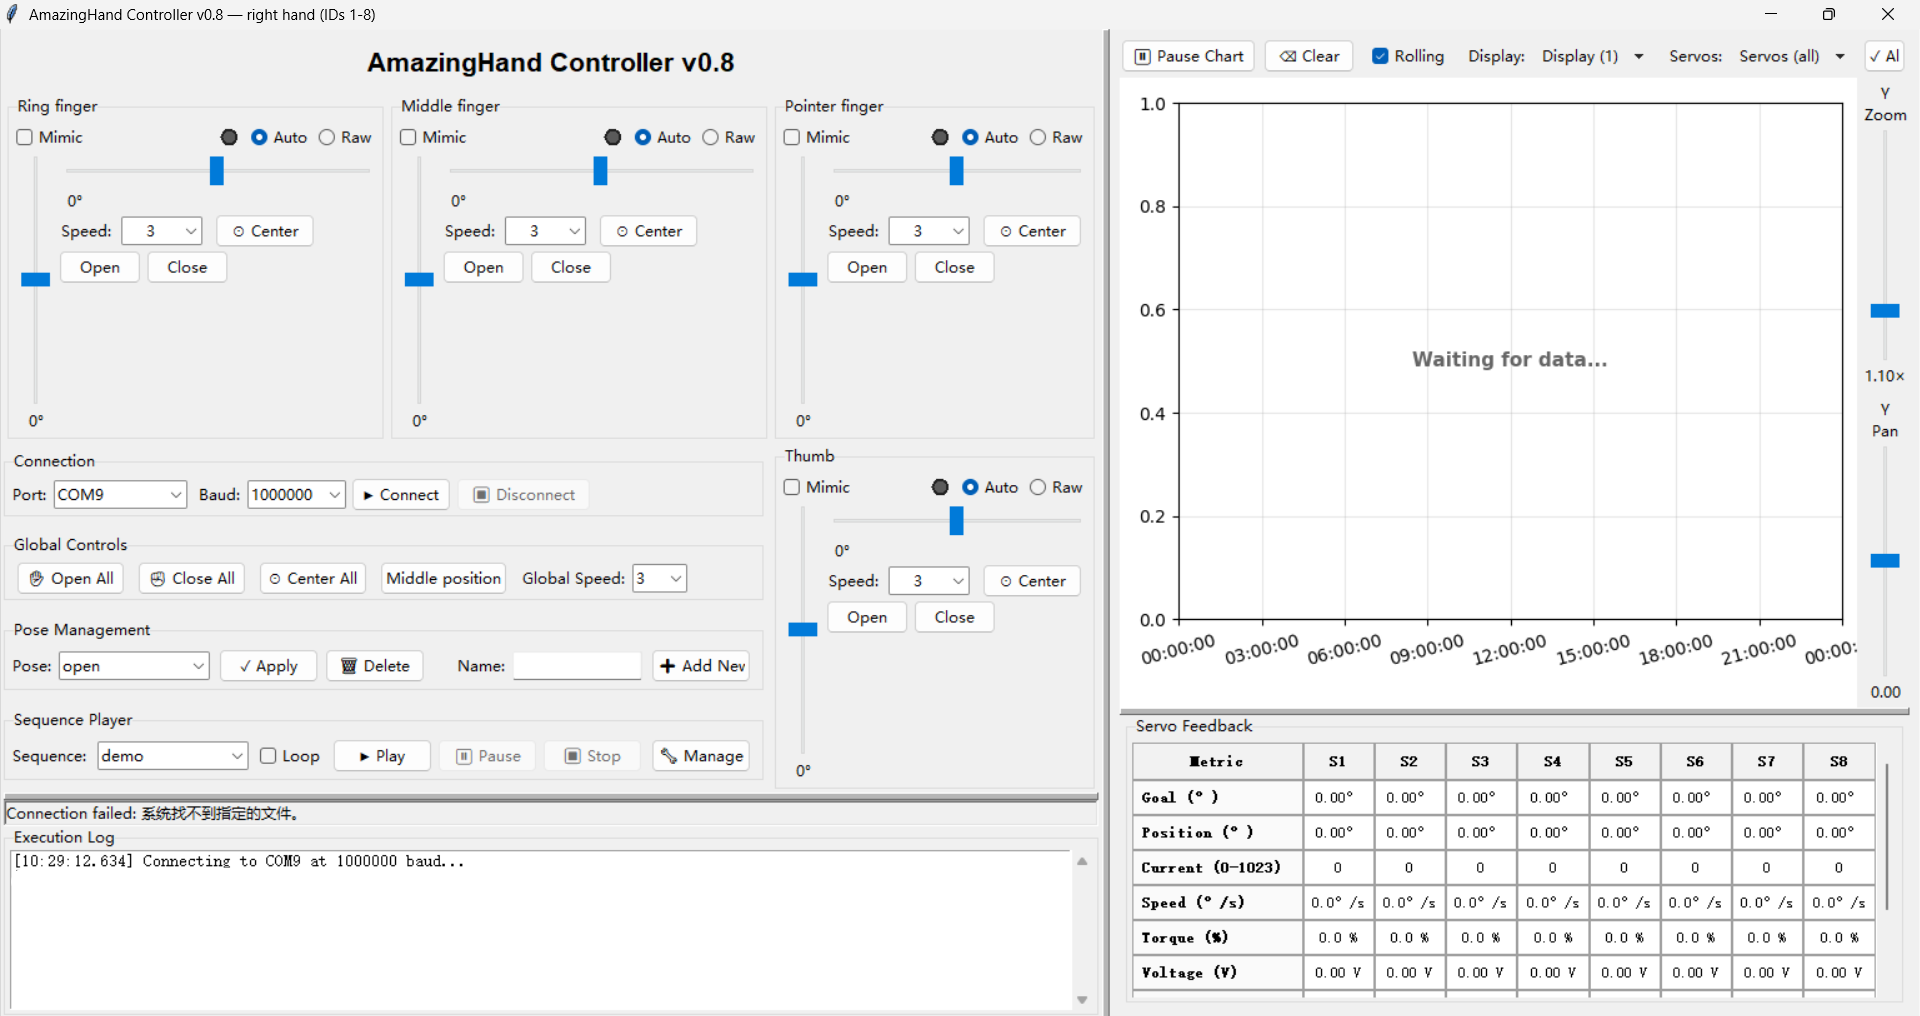
Both hands are supported. At startup, choose the right hand (servo IDs 1-8) or the left hand (servo IDs 11-18); --hand skips the prompt. The pose library is shared by both hands, and each hand maintains its own servo mapping, mounting offset and raw-value targets in data/config.yaml. See the left/right hand selection section for details.
Project structure
amazing_hand_gui.py   – Main GUI program
amazing_hand_cmd.py   – Command-line tool
hand_logic.py         – Shared business logic (UI-independent)
pyproject.toml        – Package metadata, dependencies, pytest configuration
data/
  config.yaml         – Application settings (serial port, limits, raw-value targets)
  hand_config.yaml    – Saved gestures and sequences
docs/
  REQUIREMENTS.md       – Requirements and acceptance criteria
  CONFIG_FORMAT.md      – Configuration file format guide
  scs_servo_protocol.md – SCS0009 register reference
  CHANGES.md            – Changes relative to the original and why
  user_manual.md        – Redirect page to the central tutorial
tests/
  test_hand_logic.py      – hand_logic unit tests (155)
  test_gui_utils.py       – GUI utility function unit tests (51)
  test_cmd.py             – CLI unit tests (42)
  test_integration.py     – Integration tests (14)
  test_system.py          – Subprocess system tests (22)
  test_system_hardware.py – Hardware tests (33, requires --hardware)
  test_cmd_hardware.py    – CLI hardware tests (21, requires --hardware)
Environment requirements
- Python 3.10 or later (the GUI requires Tkinter)
- A dedicated 5V external power supply for the 8 servos
- A USB serial bus adapter with its driver installed
Installation
Installing with pip (reads pyproject.toml) is recommended:
pip install -e .Or install the dependencies directly:
pip install -r requirements.txtDevelopment and test environment:
pip install -r requirements-dev.txtCalibration
The servos' angle system, gesture presets and middle position all depend on the specific hand. These parameters are all centralised in data/config.yaml.
Left/right hand selection
The two hands use different servos and mechanics, so choose before the interface opens:
  AmazingHand — which hand?
    1 = right hand  (servo IDs 1-8)
    2 = left hand   (servo IDs 11-18)
  Enter 1 or 2 [1]:
  LEFT hand — servo IDs 11-18
    Ring (11, 12)  Middle (13, 14)  Pointer (15, 16)  Thumb (17, 18)
    middle position raw: [571, 451, 571, 451, 571, 451, 571, 451]
Skip the prompt:
python amazing_hand_gui.py --hand left
python amazing_hand_cmd.py --pose victory --hand left
Without --hand, the hand: value in data/config.yaml is used.
Why a hand is more than just a different ID group. Besides the servo numbering (right hand 1-8, left hand 11-18, and the left hand's fingers are numbered in a mirrored order — ring finger first), the left hand has two mechanical differences, both handled automatically by the program:
| Right hand | Left hand | |
|---|---|---|
| Servo ID | 1-8 | 11-18 |
| Finger → ID | index 1,2 / middle 3,4 / ring 5,6 / thumb 7,8 | ring 11,12 / middle 13,14 / index 15,16 / thumb 17,18 |
| Vendor MiddlePos | [451, 571, …] | [571, 451, …] |
| Mounting offset | 0° | −35.16° (hands.left.angle_offset) |
| Dual servos per finger | (a, b) | (b, a) (hands.left.mirror_pose) |
Missing either of the last two items distorts every gesture: the mounting offset shifts each finger by 35°, and without the per-finger swap the opening direction is completely reversed (the V-sign gesture brings two fingers together while the three that should be together spread apart).
data/hand_config.yaml is shared by both hands and always stores right-hand order; the left hand converts on read and converts back on save.
Calibrating a new hand. Use the values in hands.left as a template, then verify in this order:
- Press Middle position and check whether the Current (0-1023) line reads the expected raw values
- Press Open All / Close All — the travel should reach the mechanical limits without stalling
- Try an opening gesture (victory spreads into a V, greeting brings three fingers together)
If something is wrong, here is which parameter to adjust:
| Symptom | What to change |
|---|---|
| Middle position readings are wrong | hands.<name>.raw_positions.middle |
| Opening direction is reversed | hands.<name>.mirror_pose |
| Travel is too short or overshoots | hands.<name>.raw_positions.open / close |
Angle system
Both the GUI and CLI use angle values, which the rustypot driver converts into the servos' internal raw values:
raw = 1024 × angle / 300° + 511 (0.29297°/step, raw value range 0–1023)| Angle | Meaning |
|---|---|
| −35° | fully open (extended) |
| 0° | middle position, fingers naturally slightly bent |
| +75° | fully clenched (fist) |
Each finger's two servos sit side by side with collinear axes: same-direction rotation produces splay, opposite-direction rotation produces flexion/extension. Even-ID servos are negated relative to odd-ID ones, so the same open/close value makes the two servos move in opposite directions; the program handles this automatically, so you do not need to convert manually.
Limits
limits:
  servo_min: -75      # absolute travel limits for any servo command
  servo_max: 75
  base_min: -75       # open/close slider range
  base_max: 75
  side_min: -35       # left/right slider range
  side_max: 35
side_min/side_max control the left/right spread. Because the program normalises (u = |side_offset| / |side_min|), changing only this range does not change the actual spread amplitude — it just compresses the slider scale. To genuinely change the fingers' spread angle, you must also modify auto_extremes.
Raw-value targets
The three global position buttons drive the servos to exact raw values, bypassing the angle model:
raw_positions:              # index 0 -> servo ID 1 …… index 7 -> servo ID 8
  open:   [260, 760, 260, 760, 260, 760, 260, 760]
  close:  [760, 260, 760, 260, 760, 260, 760, 260]
middle: [451, 571, 451, 571, 451, 571, 451, 571]- open / close — the two ends of the mechanical travel. Measured by driving the servos individually with the vendor's Feetech debug tool.
- middle — the calibrated mechanical middle position (i.e. MiddlePos in the vendor's Arduino demo). Note that it is not the midpoint between open and close, but about ±60 raw (±17.6°) away from raw 511.
These are per-hand calibration values. The vendor's own words are "replace values by your calibration results".
How to verify: the Servo Feedback panel has a Current (0-1023) line that shows the raw position in real time. After pressing the Middle position button, this line should read 451, 571, 451, 571, ….
Control ranges quick reference
| Control | Range |
|---|---|
| Open/close slider (vertical) | −75 … +75 |
| Left/right slider (horizontal) | −35 … +35 |
| Speed | 1 (slow) … 6 (fast) |
The driver passes the speed value to the servos as rad/s, so 1–6 roughly corresponds to 57–344 °/s. Under load the actual speed is about 70% of that value — take this into account when choosing sequence delays.
Running the GUI (amazing_hand_gui.py)
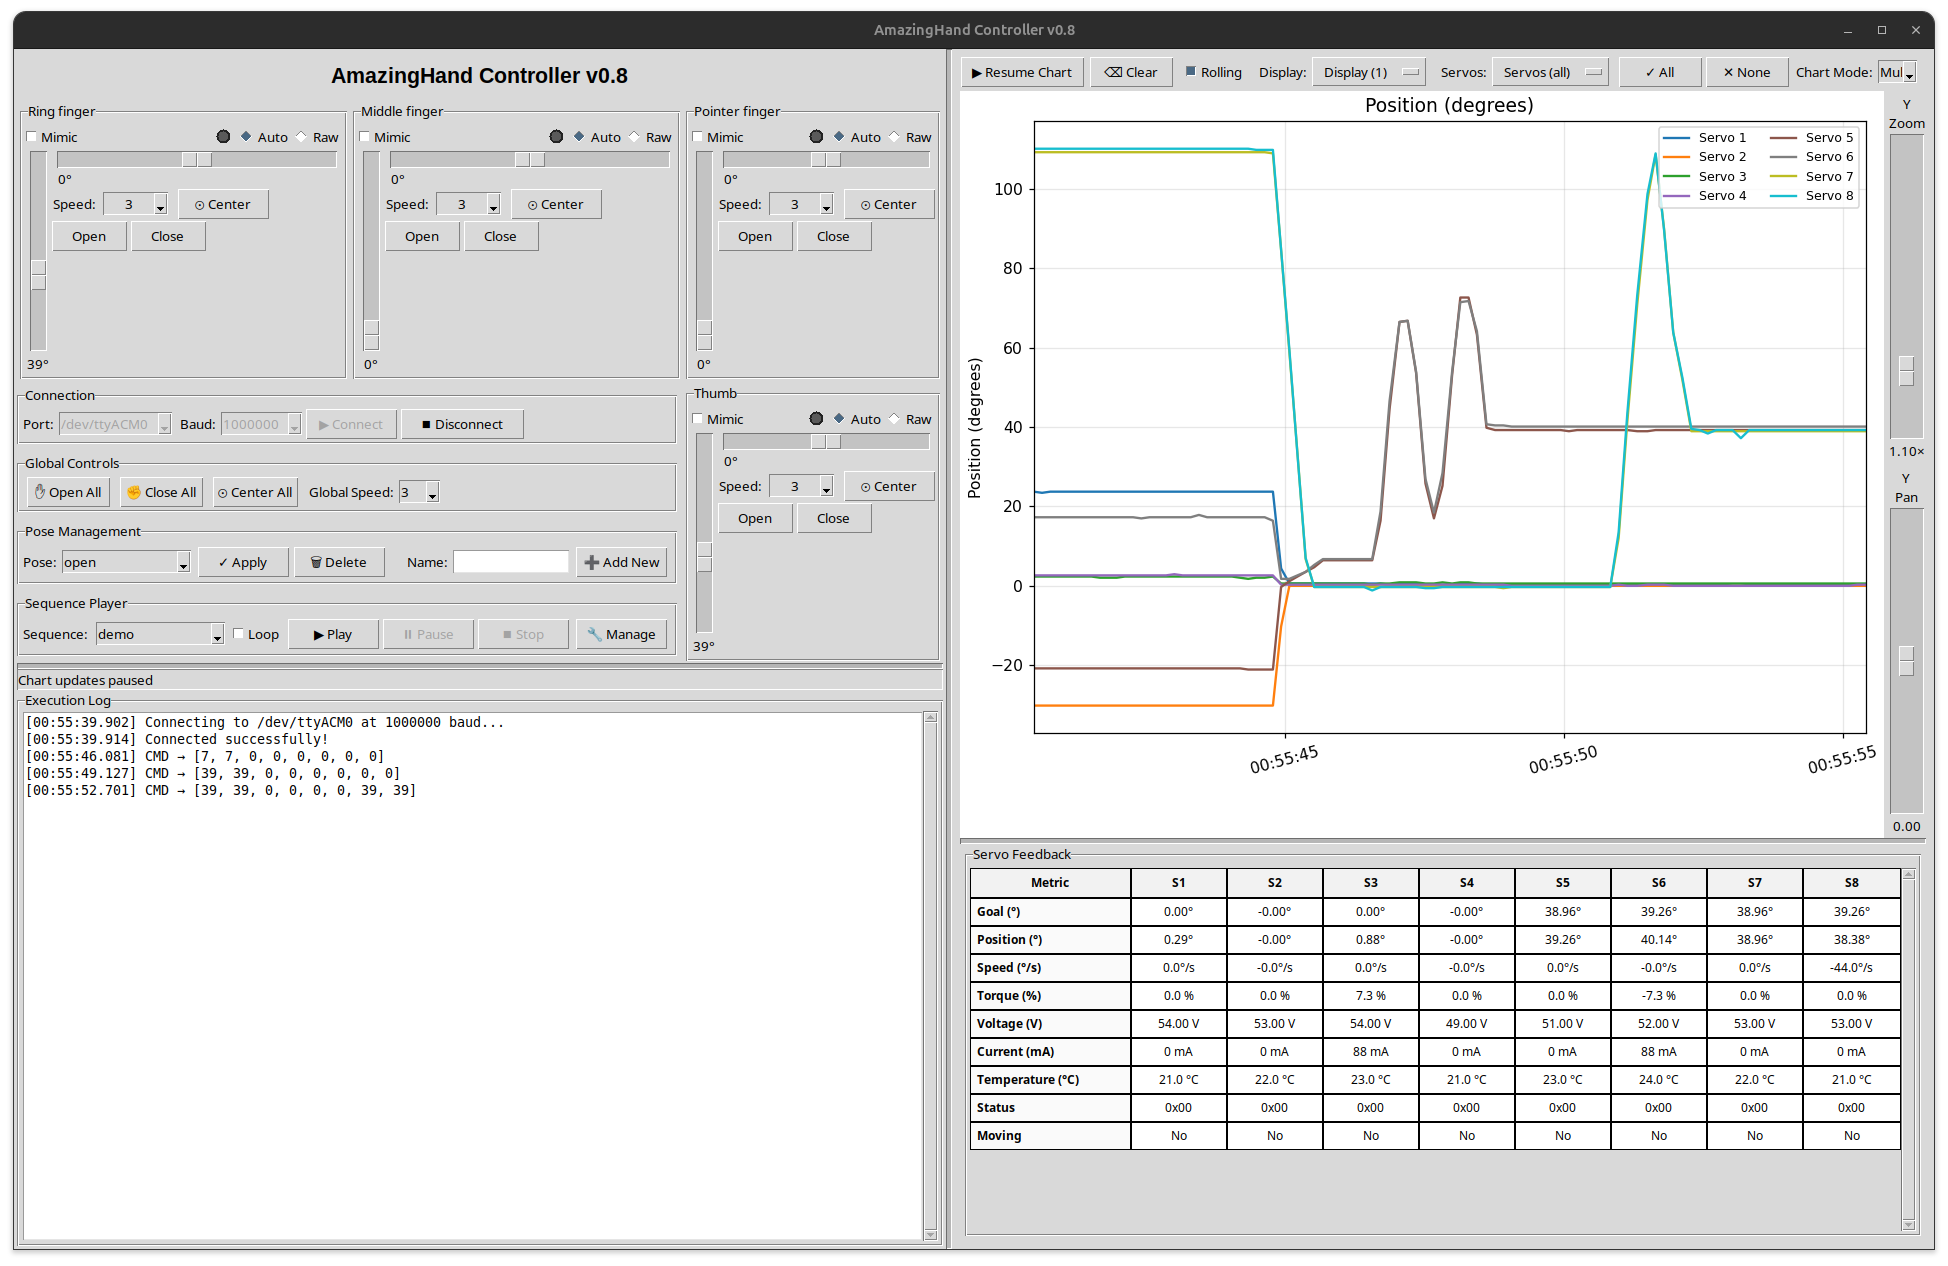
The interface is divided into four blocks:
- Left column: per-finger control panels for the four fingers, with open/close and side-offset sliders, Auto/Raw mode, speed, and Open/Close/Center.
- Middle column: global control buttons (Open All / Close All / Center All / Middle position) and pose management.
- Right column: telemetry curves and the Servo Feedback table (position, load, temperature, voltage).
- Bottom: execution log and status bar, showing connection status, action progress and error messages.
After installing with pip, you can call it directly:
amazing-hand-gui
amazing-hand-gui --port /dev/ttyUSB0
Or run it directly:
python amazing_hand_gui.py
python amazing_hand_gui.py --port /dev/ttyUSB0
The port dropdown lists the serial ports that actually exist on the machine (pyserial is preferred, falling back to the Windows registry), so adapters with higher port numbers also show up. You can type a port number directly into the dropdown. If the default port in the configuration is not plugged in, the GUI automatically starts from the first real port; pass --port explicitly to pin a port.
Features
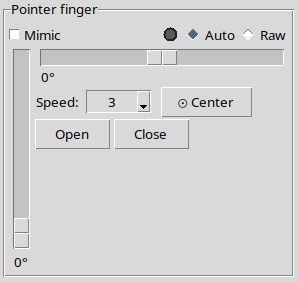
Per-finger sliders control open/close and left/right, with Auto (open/close + left/right) and Raw (direct control of the two servo angles) modes
The two sliders in Auto mode are control axes, and the program does the differential combination automatically; Raw mode gives the two servo angles directly. Each finger's two servos sit side by side with collinear axes: same-direction rotation produces splay, opposite-direction rotation produces flexion/extension.
Per-finger Open / Close / Center shortcut buttons
Per-finger speed selection (1–6), plus a global speed synchronisation dropdown
Keyboard shortcuts for precise fine-tuning
Global position buttons: Open All, Close All, Center All, Middle position
Gesture and sequence management based on
data/hand_config.yamlDelete saved gestures directly in the interface (🗑 Delete button)
Real-time servo telemetry curves (position, load, temperature, voltage)
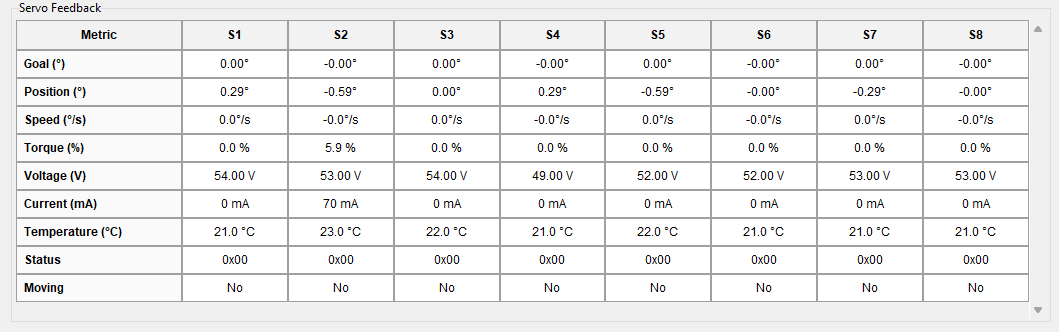
Servo Feedback table with live raw positions (0–1023), usable for calibration checks
Keyboard operation
- 1-4: select a finger (Ring, Middle, Pointer, Thumb)
- Arrow keys: move the selected finger
- Up/down: close / open
- Left/right: move left/right
- Modifier keys:
- None: 1° per step (fine)
- Shift: 5° per step (normal)
- Ctrl: 10° per step (fast)
- Shortcut actions:
- Q: fully close the selected finger
- E: fully open the selected finger
- C: centre the left/right position
Global buttons
| Button | Open/close | Left/right |
|---|---|---|
| ✋ Open All | all fingers to raw value open | centred |
| ✊ Close All | all fingers to raw value close | centred |
| ⊙ Center All | unchanged | centred |
| ⊙ Middle position | all fingers to raw value middle | centred |
The Global Speed dropdown (1–6) immediately applies the selected speed to all finger controls and synchronises each finger's slider display.
The three raw-value buttons (Open All, Close All, Middle position) bypass the angle model, so after execution the sliders show the nearest representable value, not the exact value. Touching a slider afterwards moves the hand up to about 0.3° away from the raw target — a deliberate trade-off to hit the calibrated positions exactly.
Known issue: Center All does not skip fingers in Raw mode, and will overwrite raw angles you set manually. The single-finger ⊙ Center button does not.
Running the CLI (amazing_hand_cmd.py)
A standalone command-line tool that applies gestures and plays sequences without launching the GUI. It reads the same data/hand_config.yaml as the GUI and sends the stored pose values verbatim — exactly the same as what the GUI sends.
Linux: serial port permissions
USB serial adapters usually appear as /dev/ttyACM0 (Waveshare / CDC-ACM) or /dev/ttyUSB0 (FTDI / CH340).
How to find them:
ls /dev/ttyACM* /dev/ttyUSB* 2>/dev/null
# or
dmesg | grep -E 'ttyACM|ttyUSB' | tail -5
If you get Permission denied, add the current user to the dialout group and log in again:
sudo usermod -aG dialout $USERAfter pip installation
amazing-hand-cmd --list
amazing-hand-cmd --pose open
amazing-hand-cmd --sequence demo --loop
amazing-hand-cmd --pose open --speed 6
# Override the serial port when needed:
amazing-hand-cmd --pose open --port /dev/ttyUSB0
Running directly
python amazing_hand_cmd.py --list
python amazing_hand_cmd.py --pose open
python amazing_hand_cmd.py --pose close --speed 6
python amazing_hand_cmd.py --sequence demo
python amazing_hand_cmd.py --sequence wave --loop
python amazing_hand_cmd.py --port /dev/ttyUSB0 --pose open
python amazing_hand_cmd.py --list --config /path/to/hand_config.yaml
Arguments
| Argument | Default | Description |
|---|---|---|
| --pose NAME | – | Apply the gesture with the given name |
| --sequence NAME | – | Play the sequence with the given name |
| --list | – | List all gestures and sequences |
| --loop | off | Loop the sequence until Ctrl+C |
| --speed N | 3 | Servo speed 1 (slow) … 6 (fast) |
| --port PORT | Linux /dev/ttyACM0 Windows COM9 | Serial port number |
| --baudrate N | 1000000 | Baud rate |
| --config PATH | data/hand_config.yaml | Use another configuration file |
| --hand | hand in config.yaml | Which hand to use (right 1-8, left 11-18) |
When the script exits (including Ctrl+C), it automatically turns off torque on all servos.
The CLI has no --config argument corresponding to data/config.yaml; that file is always loaded from the project directory.
Configuration files
data/config.yaml
| Section | Purpose |
|---|---|
| serial | Default serial port per platform, baud rate, selectable baud rate list |
| servos | Servo IDs corresponding to each finger |
| limits | Angle ranges for the servos and the two sliders |
| speeds | Default/min/max values for the 1–6 speed scale |
| auto_extremes | Servo positions when the left/right slider reaches its limit |
| raw_positions | Exact raw-value targets for the global position buttons |
| paths | Location of the gesture/sequence files |
Servo-to-finger mapping
| Finger | Servo ID | Pose array index |
|---|---|---|
| Pointer | 1, 2 | 4, 5 |
| Middle | 3, 4 | 2, 3 |
| Ring | 5, 6 | 0, 1 |
| Thumb | 7, 8 | 6, 7 |
The pose array order is ring, middle, index, thumb — not servo ID order. This is the easiest thing to get wrong when editing hand_config.yaml by hand.
The comment at the top of amazing_hand_cmd.py says "index 0→servo1 … 7→servo8"; that comment is wrong — the table above reflects the code's actual behaviour.
Gestures and sequences

All gestures and sequences are stored in data/hand_config.yaml. The GUI creates the file automatically if it does not exist.
Saving a gesture
- Use the sliders or keyboard to move the hand into the target pose
- Enter a name in the "Name:" entry box
- Click "➕ Add New" in the Pose Management area
Speed only affects how fast the sliders move; a saved gesture records only the 8 servo positions.
Loading / deleting gestures
- Select one from the dropdown and click ✓ Apply to move the hand to that pose
- Click 🗑 Delete to the right of Apply, and confirm to delete it permanently
Sequence management
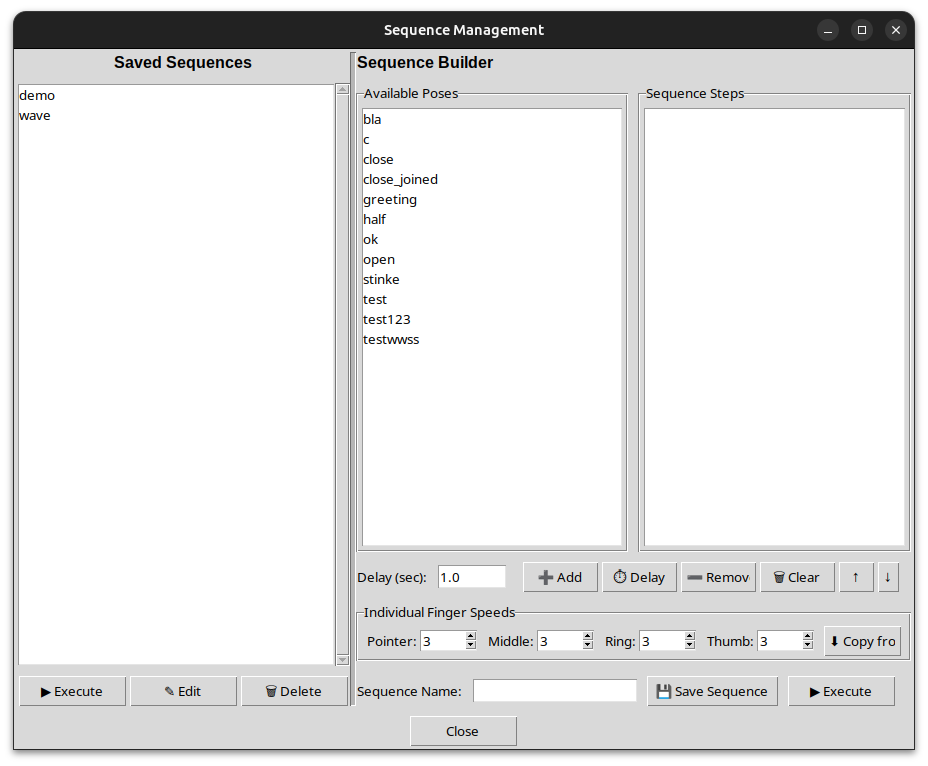
- Click "🔧 Manage" in the Sequence Player to open the sequence manager
- Saved Sequences (left column)
- View, execute, edit or delete existing sequences
- Double-click or click "▶ Execute" to run one once
- Sequence Builder (right column)
- Double-click a gesture in "Available Poses" to add it as a step
- Each step can have its own speed and delay for the 8 servos; steps are saved in the form "pose:s1,s2,...,s8|delay"
- Use ↑/↓ to change the order, or the "⏱ Delay" button to insert a standalone pause
- Enter a name and click "💾 Save Sequence" to save; click "▶ Execute" to try it without saving
- Back in the main window, tick Loop in the Sequence Player for continuous playback
Step format
pose_name:speed1,speed2,...,speed8|delay- speed1..speed8 — the 8 servo speeds (1–6) in pose order
- delay — the wait before the next step, e.g. 0.6s. Optional; if omitted, the GUI falls back to a fixed automatic wait
- A standalone pause is written SLEEP:1.0s (no comma-separated speed list)
Choosing delays. The driver can actually read whether the servos have stopped, but sequence playback uses fixed delays. Estimate roughly as travel angle / (speed × 57.3 × 0.7) seconds and leave a margin — on a loaded hand, motions over about 130° need more than 1.0 second at speed 3.
YAML format example
poses:
  open:
    positions: [-35, -35, -35, -35, -35, -35, -35, -35]
  close:
    positions: [75, 75, 75, 75, 75, 75, 75, 75]
  ring_close:                 # ring finger clenched, the rest open
    positions: [75, 75, -35, -35, -35, -35, -35, -35]

sequences:
  demo:
    steps:
      - "open:3,3,3,3,3,3,3,3|2.0s"
      - "close:6,6,6,6,6,6,6,6|2.0s"
      - "ok:3,3,3,3,3,3,3,3|1.0s"
      - "victory:3,3,3,3,3,3,3,3|1.0s"
      - "greeting:3,3,3,3,3,3,3,3|1.5s"
      - "close:6,6,6,6,6,6,6,6|2.0s"
  wave:
    steps:
      - "open:6,6,6,6,6,6,6,6|0.8s"
      - "wave_r:5,5,5,5,5,5,5,5|0.6s"
      - "wave_l:5,5,5,5,5,5,5,5|0.6s"
      - "open:5,5,5,5,5,5,5,5|0.8s"
  finger_roll:
    steps:
      - "open:6,6,6,6,6,6,6,6|0.5s"
      - "ring_close:5,5,5,5,5,5,5,5|0.6s"
      - "open:5,5,5,5,5,5,5,5|0.5s"
      - "middle_close:5,5,5,5,5,5,5,5|0.6s"
      - "open:5,5,5,5,5,5,5,5|0.5s"
Looping is controlled at runtime (the GUI checkbox) and is no longer written into the YAML.
Tests
The project includes 284 unit/integration/system tests and 54 hardware tests.
Run all tests (no hardware needed)
pytestRun the GUI + CLI hardware tests (servos must be connected)
pytest tests/test_system_hardware.py --hardware --port /dev/ttyACM0
pytest tests/test_cmd_hardware.py --hardware --port /dev/ttyACM0
# Or both together:
pytest tests/test_system_hardware.py tests/test_cmd_hardware.py --hardware
test_system_hardware.py verifies connection, gesture application, telemetry reading, single-finger open/close and waving, speed control, sequence execution and motion detection.
test_cmd_hardware.py verifies the CLI layer end to end: pose positions, speed arguments, sequence steps, wait_for_motion, --list output, and torque-off on exit.
For the complete acceptance criteria, see Requirements and tests.
Note: the non-hardware tests assert the fallback defaults in hand_logic.py, which are still the original −40…110 scale. At runtime data/config.yaml overrides them, so the tests pass no matter how you calibrate — but that also means the tests do not validate your current calibration parameters.
Servo ID configuration
Tutorial for configuring servo IDs with the official Feetech software and a serial bus driver: https://www.robot-maker.com/forum/tutorials/article/168-brancher-et-controler-le-servomoteur-feetech-sts3032-360/
Feetech software download: https://github.com/Robot-Maker-SAS/FeetechServo
Telemetry and feedback
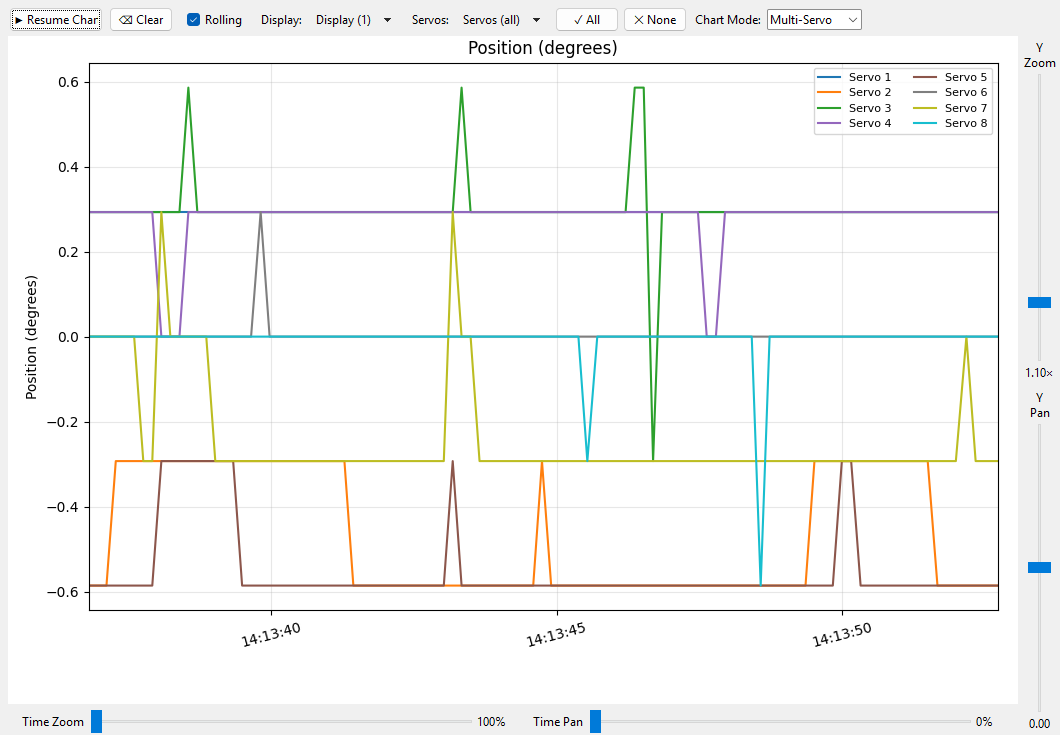
- Metric selection: position, load, speed, temperature, voltage, moving flag.
- Chart modes: Multi-Servo (multiple servo traces) and Scope (single-channel oscilloscope).
- Zoom/pan: Y Zoom / Pan, Time Zoom / Pan.
- Feedback table: Goal, Position, Speed, Load, Voltage, Temperature, Status, Moving.
Sequence editor
- Click Manage in the Sequence Player.
- Use Available Poses to add steps, and adjust per-finger speed, step delay or insert a sleep.
- Use ↑/↓ to reorder, enter a name and save; you can also Execute first to try it out.
- Back in the main window, select the sequence and Play; enable Loop for continuous playback.
Sequence definitions live under the sequences key in data/hand_config.yaml.
Troubleshooting
| Symptom | Suggestion |
|---|---|
| No serial ports listed | Re-plug the USB adapter, install the driver or restart the GUI. |
| Connect button greyed out | Already connected; click Disconnect first. |
| Window resizing is laggy | Close unnecessary windows; resizing is debounced/throttled. |
| Sequence does not drive all fingers | Check each step's speed and make sure every pose contains all 8 servo values. |
| Blocked indicator persists | Check for mechanical binding; a large difference between target and actual position with no motion triggers "blocked". |
Related development documentation
- Configuration format (YAML)
- SCS0009 protocol memory table
- Design changes and calibration notes
- Requirements and tests
Acknowledgements
Original project: Betatester777 Hardware and reference firmware: Pollen Robotics