

SCS0009 Servo Debugging and Calibration
The SCS0009 version has two sets of debugging content:
- TTL assembly and middle-position debugging: wiring, setting servo IDs, securing the servo horns, fine-tuning the middle position, running the test.
- SCS0009 debug tool: a Python + PySide6 GUI to scan the bus, read/write all registers, control position, change the baud rate/restore factory settings, and back up the xdat EEPROM.
For protocol register details, see the SCS0009 protocol memory table.
For Arduino/extension wiring, see Arduino Nano.
1. TTL debugging: assembly, ID and middle position
First, download the "灵巧手调试.zip" archive. After extracting it, you can use the "使用arduio程序调试灵巧手过程(TTL舵机)" document to set servo IDs, calibrate, adjust the middle position and run the demo program, or refer to the official open-source code.
For a factory unit with no disassembly (the servo IDs, calibration and middle position are already set at the factory), you can skip directly to item 6, running the "02 演示程序" and hand tracking.
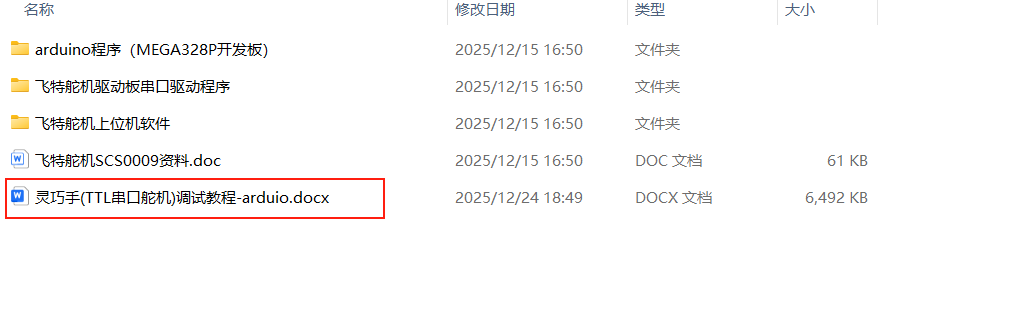
1. Wiring for debugging the dexterous hand
One option is to run host software such as Python on a computer, e.g. the Feetech servo host software or a Python script.
The other is to use an MCU such as the MEGA328P, or a dev board or controller you bought yourself.
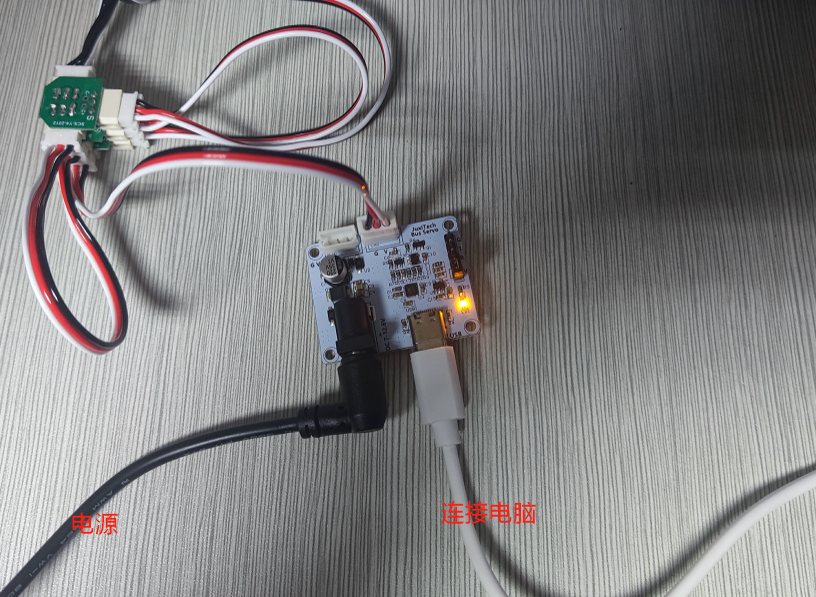
The wiring is as follows:
(1) Wiring for Python debugging (connect only the servo driver board):
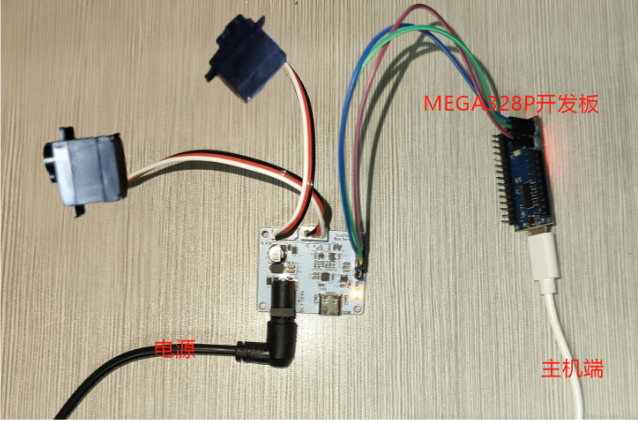
(2) Wiring for MEGA328P dev board debugging (servo driver board + 328P dev board):
Check the pin positions on the MEGA328P dev board carefully!
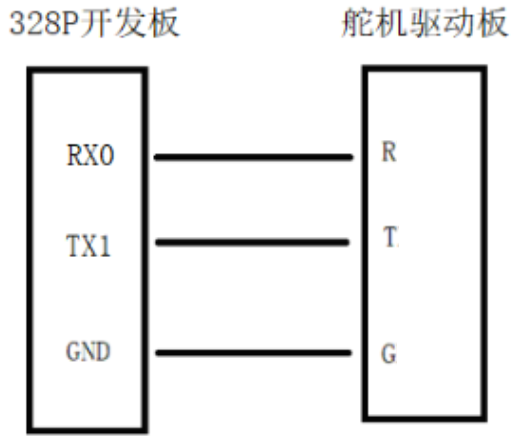
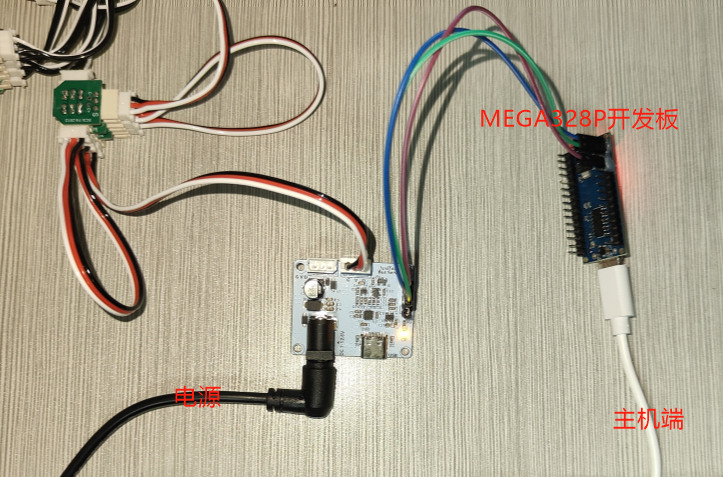
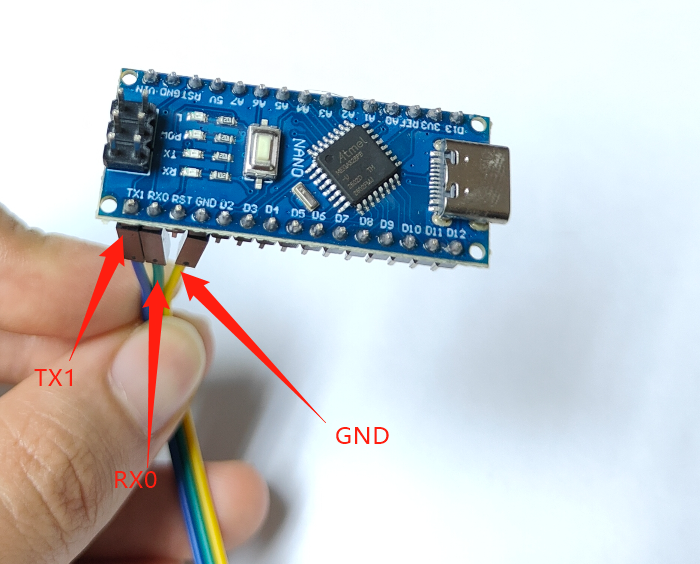
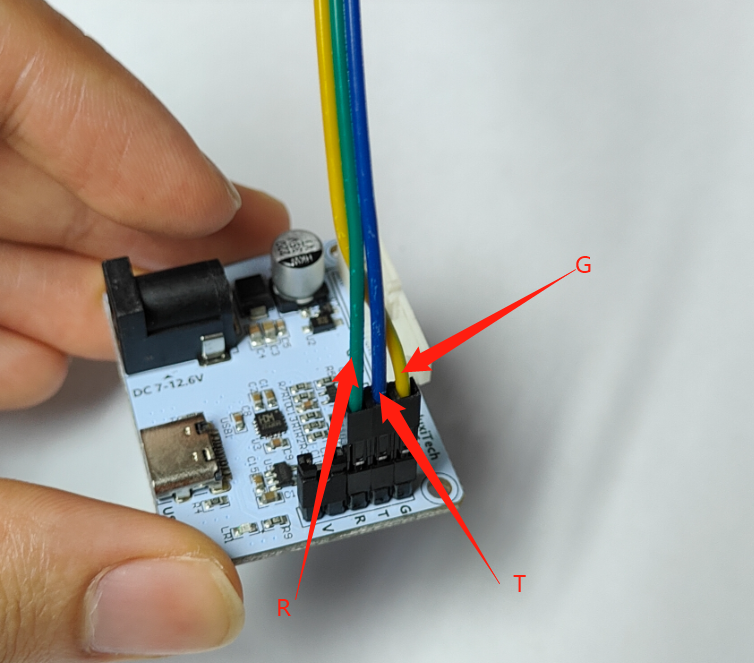
The process below uses an MCU; the MCU itself keeps looping the demo program, so just disconnect the data cable to stop it.
2. Setting the servo ID
A single dexterous hand uses 8 servos in total; the right hand's IDs must be set to 1-8 and the left hand's to 11-18
Middle-position calibration, factory default: right hand [451,571,451,571,451,571,451,571], left hand [571,451,571,451,571,451,571,451]
- Wiring: connect one servo at a time to the servo driver board in turn.
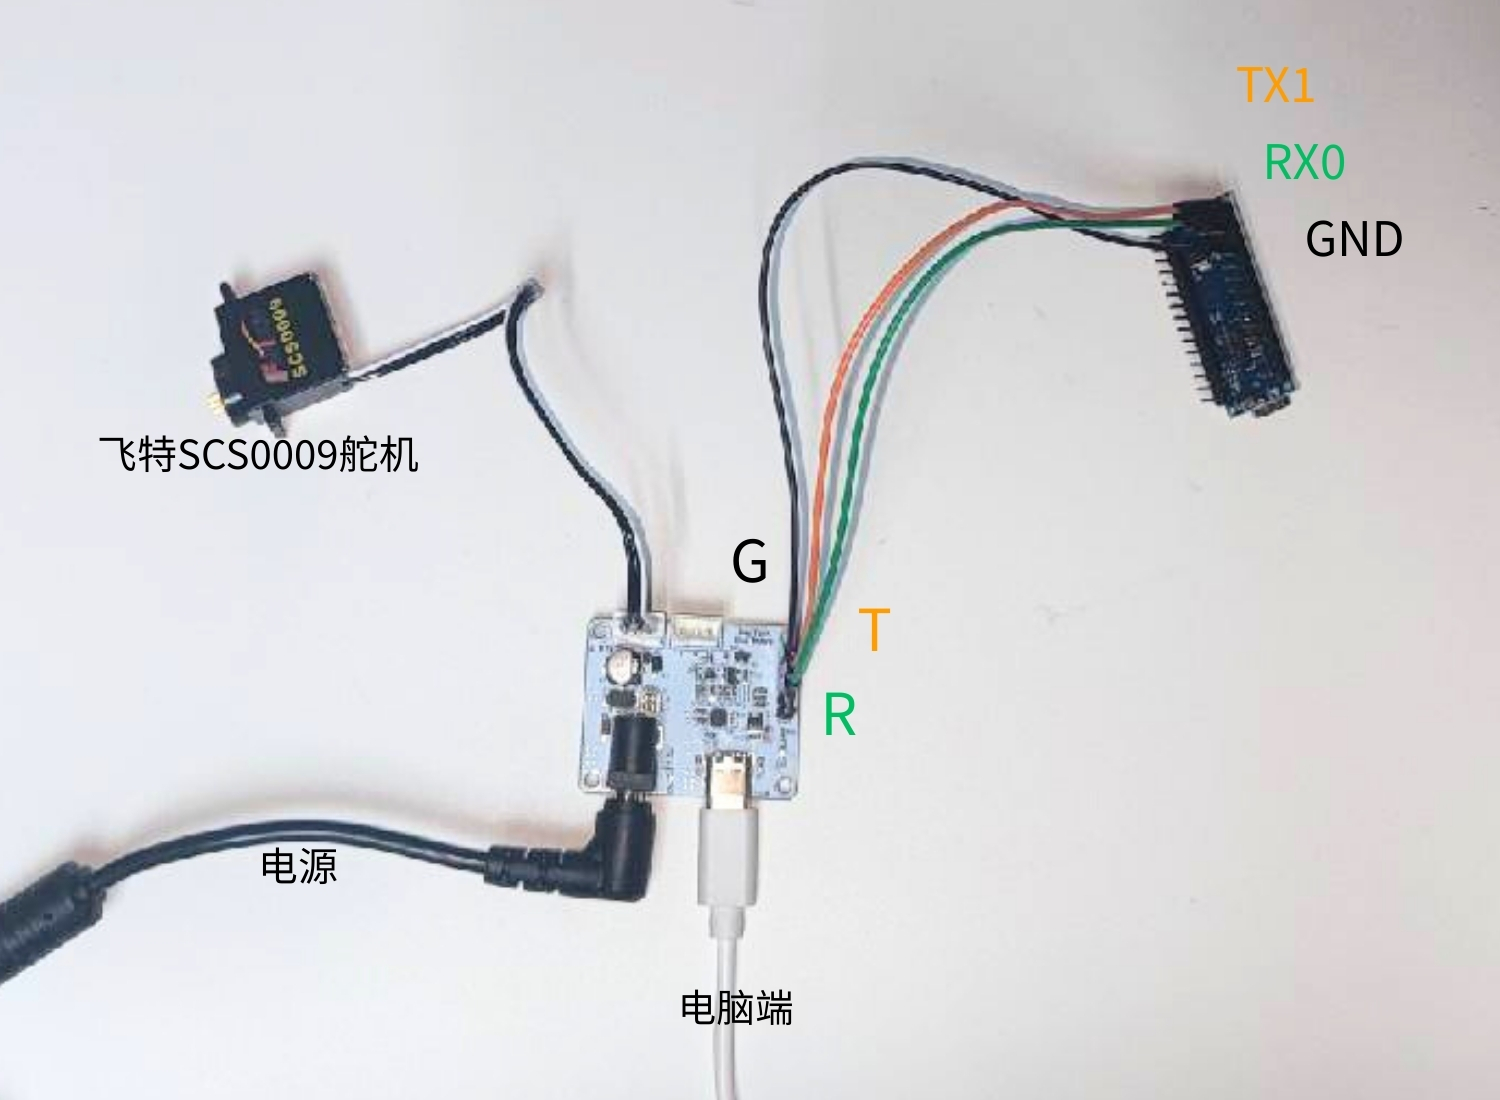
- Use the host software FD1.9.8.2 provided by the servo vendor to set it
FD.rar
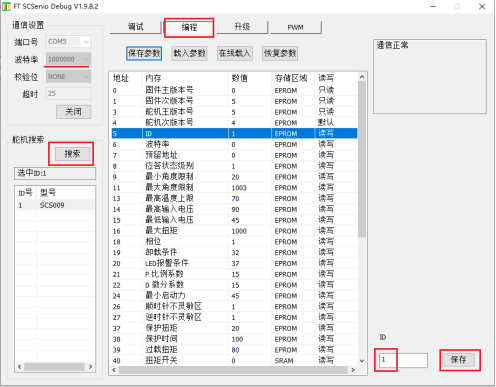
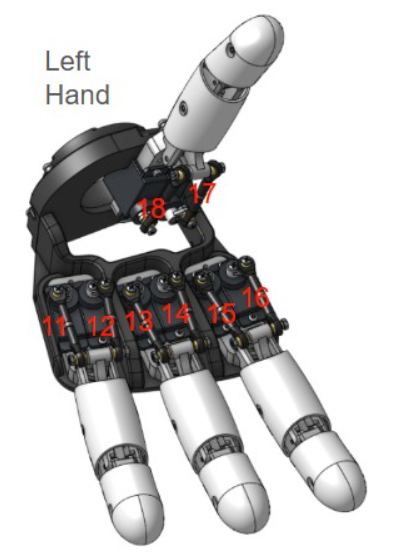
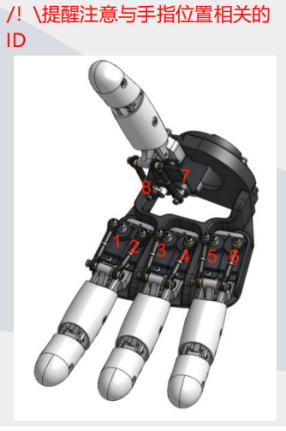
3. Securing the servo horns
- Upload the code program "安装白色伺服喇叭时使用" to the dev board
What this program does: it puts the servo gears at a roughly centred position; all subsequent motion angles are based on this middle position.
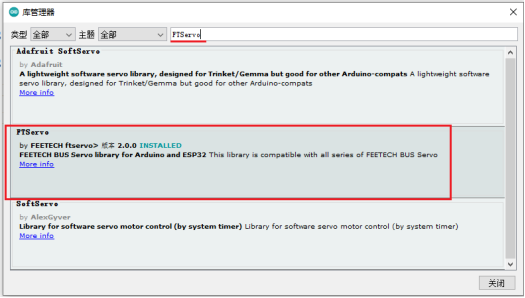
(1) Install the Arduino software yourself, referring to the installation tutorial for your system. To compile and download an Arduino program, first install the FTServo library and the SCServo library in the Library Manager
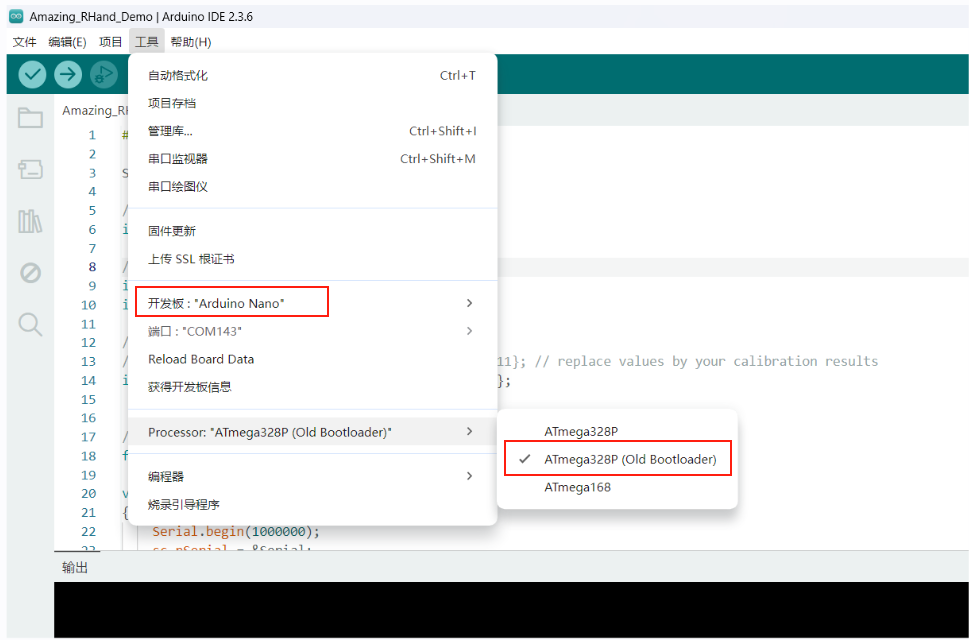
(2) Board type: select "Arduino Nano"
- Debug servos 1 and 2
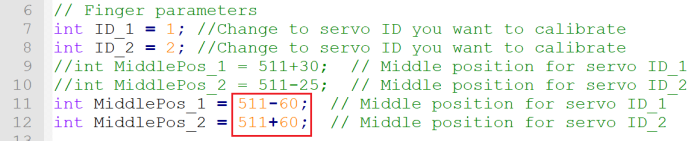
(1) Edit: change the following positions according to the servo IDs to be debugged. For example, to debug the index finger, set the ID values to 1 and 2

(2) Upload the program to the dev board
(3) Wiring: connect the dev board to the servo driver board and to servos 1 and 2; you can hear the servo gears rotate by a certain angle and then stop.
(4) Install the servo horns on the gears, keeping them as parallel as possible
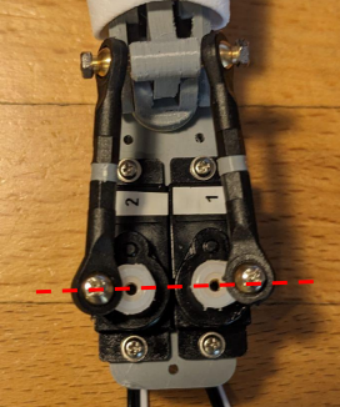
- Debug servos 3 and 4
(1) Disconnect the wiring between the 328P dev board and the servo driver board (otherwise the upload will fail)
(2) Edit: set the ID values to 3 and 4
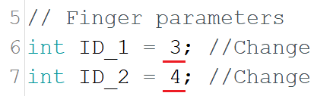
(3) Upload the program to the dev board
(4) Wiring: connect the dev board to the servo driver board and to servos 3 and 4; you can hear the servo gears rotate by a certain angle and then stop.
(5) Install the servo horns on the gears, keeping them as parallel as possible
- Debug servos 5 and 6
Same steps as above
- Debug servos 7 and 8
Same steps as above
4. Fine-tuning the middle value
Upload the code program "01 微调MiddlePos值时使用" to the dev board
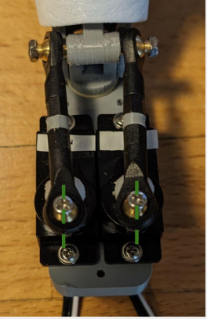
When the fingers are in the closed position, stop the program immediately (just disconnect the data cable) and check whether the servo horns are correctly aligned (see the figure below). If they are not aligned, adjust the MiddlePos_1 and MiddlePos_2 values in the program until they are. Record these values (8 servos correspond to 8 values); they will be used in the final program.
5. Running the test program
- Fill the MiddlePos_1 and MiddlePos_2 values saved above into the array below and download the program.

6. Run the "02 演示程序"
(1) Install the Arduino software yourself, referring to the installation tutorial for your system
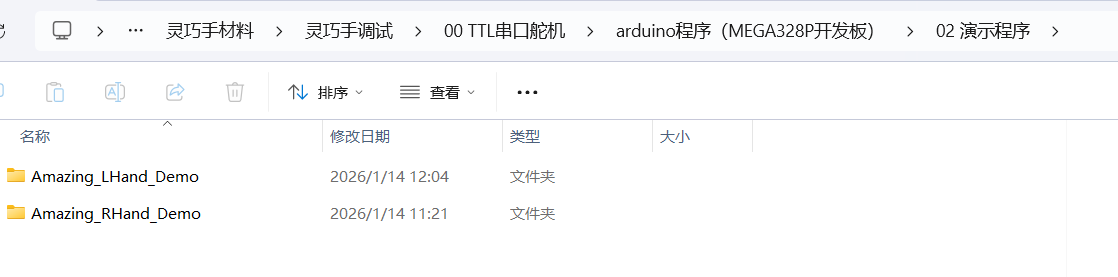
(2) In the 灵巧手调试\00 TTL串口舵机\arduino程序(MEGA328P开发板)\02 演示程序 directory, open the corresponding ino file for the left or right hand
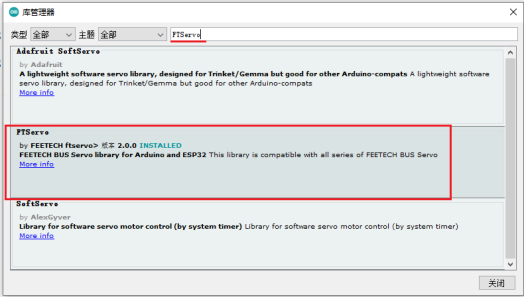
(3) To compile and upload an Arduino program to the dev board, first install the FTServo library and the SCServo library in the Library Manager
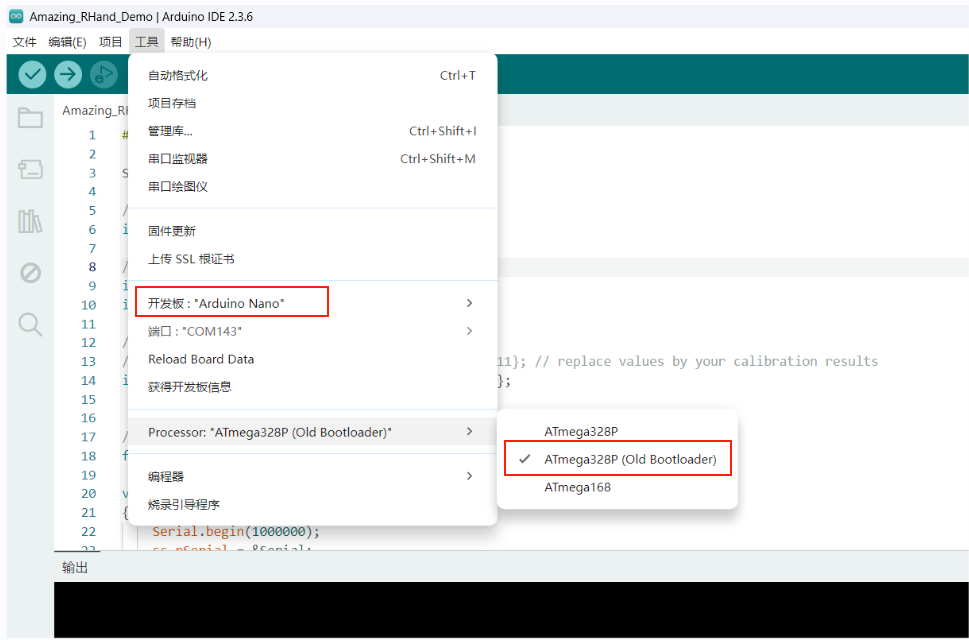
(4) Board type: select "Arduino Nano"
(5) Compile and upload
Note: at this point the computer is connected only to the dev board, and the dev board is not yet connected to the servo driver board (i.e. not connected to the dexterous hand).
After a successful upload, connect the dev board to the servo driver board with three jumper wires, and connect the servos to the servo driver board; refer to MEGA328P dev board debugging wiring.
The dexterous hand will keep looping the "02 演示程序"
The result looks like this:
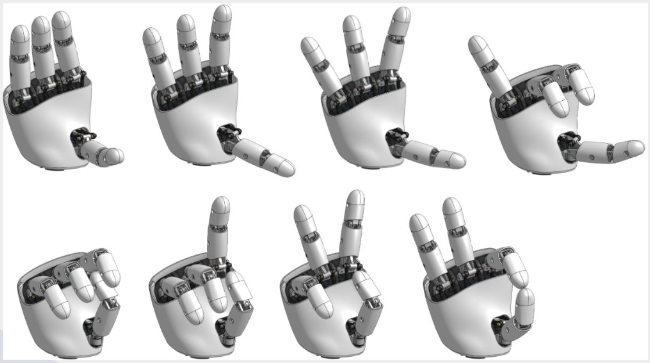
2. SCS0009 debug tool
For Windows 10 / 11; for Linux and macOS differences, see Section 8. This tutorial covers every step from environment installation to complete debugging.
⚠️ Compatibility note: this tool currently supports only Feetech SCS0009 servos (SCS series, potentiometer position feedback, 10-bit resolution 0–1023). The register table and xdat parameter format are designed for the Feetech SCS0009; compatibility with other brands/models is not guaranteed.
1. Environment requirements
| Dependency | Version | Description |
|---|---|---|
| Python | >= 3.8 | 3.10+ recommended; download from python.org |
| PySide6 | >= 6.0 | GUI framework |
| pyserial | >= 3.5 | Serial communication |
| System | Win10 / Win11 | any edition |
2. Installing Python
- Visit https://www.python.org/downloads/
- Download the Python 3.10+ installer
- During installation, be sure to tick "Add Python to PATH" (otherwise the command line cannot find python)
Verify the installation:
python --version3. Installing the dependencies
Installing in a virtual environment is recommended, to avoid polluting the system Python:
# Enter the project directory
cd SCS0009_ServoController

# Create a virtual environment
python -m venv .venv

# Activate the virtual environment (Windows)
.venv\Scripts\activate

# Install the dependencies
pip install -r requirements.txt
⚠️ The virtual environment only needs to be created once. Running the command again overwrites the existing environment (clearing installed dependencies). After that, each time you only need to
activateit.
Tip: after activation, the command-line prompt is prefixed with
(.venv).
4. Checking the environment
python setup.pyIf you see [OK] 环境检查通过,可以运行项目, the environment is correct.
5. Connecting the hardware
- Plug the USB-to-serial adapter (such as CH340 / CP2102) into the computer
- Connect the servo controller (robot arm control board)
- Power the servos (DC 5V 5A recommended; Pro version DC 12V 5A)
Open Device Manager (Win+X → Device Manager) and confirm the serial port number:
Ports (COM & LPT)
  └─ USB-SERIAL CH340 (COM3)     ← your servo serial port
Note the COM number; select it when starting the program.
6. Starting the GUI
python -m src.gui.factory_calibration_toolOr specify the port manually (when the serial port is occupied):
python -m src.gui.factory_calibration_tool --port COM3List the available ports:
python -m src.gui.factory_calibration_tool --list-ports7. Interface workflow
The interface uses a single-panel layout; a scrollbar appears automatically when the window is not tall enough, and it stretches to fit when maximised.
7.1 Serial port connection
- Select the port and baud rate (default 1M) and click Connect
- The status shows
🟢 Connected
7.2 Scanning servos
- Click Scan servos to detect online servos with IDs 1-254
- The scan results are shown in the servo list in real time (with model names)
- Click a row in the servo list → it is filled into the servo dropdown automatically
7.3 Reading and writing parameters
- Read parameters: read all 44 registers (EEPROM + SRAM); the log shows the results in real time
- Parameter table: displayed in 5 columns (address/register/value/storage area/read-write), with EEPROM/SRAM/DEFAULT distinguished by colour
- Click-to-link: click a row in the parameter table → it fills "write address", "length" and "value" automatically
- Write: after changing the value, click write; the program automatically unlocks/writes/locks
- Write result popup: success shows a green "✅ Written successfully", failure shows a red "❌ Write failed" (with the reason)
7.4 Changing the servo ID
- Connect only the one servo whose ID is to be changed to the bus, to avoid conflicts with existing IDs.
- Find the "servo ID" row (address
0x05) in the parameter table and select it. - Change "value" to the target ID and click ✏️ Write; the program automatically unlocks → writes → re-locks.
- Re-scan the bus afterwards to confirm. Use 1–8 for the right hand and 11–18 for the left hand.
7.5 Position control
- Drag the slider or type the target position directly (0–1023); the value box and slider stay in sync.
- Click ▶ Move; the status bar shows "Moving…".
- When it arrives, it prompts "Move complete, please turn off torque"; click ⏹ Torque off.
7.6 Baud rate / restore factory settings
- Change baud rate: select the new baud rate (38400–1000000 bps) and write it; the program switches the serial port baud rate and verifies with a ping, rolling back automatically on failure.
- Restore factory settings: restore the factory defaults (ID=1, baud rate 1M); re-scan afterwards.
7.7 xdat parameters (EEPROM only)
💾 Save current servo: save the EEPROM parameters of the current servo ID to an xdat file (backup)📂 Open xdat: load a backup file📤 Restore parameters to servo: write the backup back to the servo
8. Linux and macOS differences
Linux
- Fonts:
sudo apt install fonts-noto-cjk fonts-noto-color-emoji, otherwise the Chinese interface may be blank and emoji may show as squares. - Serial port permissions:
sudo usermod -a -G dialout $USER, effective after logging out and back in;groupsshould includedialout. Temporarily you can usesudo chmod 666 /dev/ttyUSB0. - Device names:
/dev/ttyUSB*(CH340 / CP2102 / PL2303) or/dev/ttyACM*(onboard USB serial); uselsusb,dmesg | grep -i ttyto find the manufacturer. - Fixed device name (optional): write
SUBSYSTEM=="tty", ATTRS{idVendor}=="1a86", ATTRS{idProduct}=="7523", SYMLINK+="ttyServo"in/etc/udev/rules.d/99-servo.rules, then use/dev/ttyServo. - Starting:
python -m src.gui.factory_calibration_tool --port /dev/ttyUSB0. - FAQ: if
pipreports externally-managed-environment, use a venv, or add--break-system-packages.
macOS
- Python: installing with Homebrew (
brew install python) is recommended; do not use the old system Python. - Serial port naming: use
/dev/cu.*, not/dev/tty.*(the latter may block); list them withls /dev/cu.*. - USB drivers: CH340 / CP2102 / FTDI are mostly driver-free; older batches of CH340 need the WCH driver; troubleshoot with
system_profiler SPUSBDataType. - Starting:
python -m src.gui.factory_calibration_tool --port /dev/cu.usbserial-0001. - Apple Silicon: use native Python 3.10+, avoiding an old Python under Rosetta; if the first run says "cannot verify the developer", allow it in "Privacy & Security".
- Power saving: macOS sleep may disconnect the serial port; keep the machine awake while operating.
9. Notes
- Writes are persistent: once parameters are written to EEPROM the original values are overwritten and cannot be undone; back up with xdat before changing anything.
- Stable power: insufficient power causes lost steps, communication failures or servos losing connection; supply power as required by SCS0009 wiring and power.
- Exclusive serial port: the same port cannot be opened by two programs at once; close serial monitors, host software and other programs using it before use.
- ID change risk: connect only one servo whose ID is to be changed to the bus; if it loses connection after the change, try "restore factory settings" (the ID returns to 1).
- Over-temperature/over-voltage: the tool monitors voltage and temperature (alarm above 60 °C); stop and cool down during sustained high temperature.
- Hot-plugging: after unplugging USB the program tries to reconnect; after plugging back in, click refresh ports.
- Windows console garbled text: if the command-line tool shows garbled emoji, set
PYTHONIOENCODING=utf-8before running it.
10. FAQ
| Problem | Solution |
|---|---|
| Cannot find the serial port | Check the driver in Device Manager; try another USB port; install the CH340 driver |
| Serial port occupied | Close programs such as serial monitors; restart the tool |
| Chinese fonts show as blank | The system default is Microsoft YaHei; if it is abnormal, install Chinese fonts |
| Servo scan finds nothing | Check the power/wiring; confirm the baud rate is 1M |
| Write failed | Check the servo's power and connection; confirm the target register is writable |
| PermissionError opening the serial port | Make sure no other process is occupying that COM port |
Linux: Permission denied: /dev/ttyUSB0 | The user is not in the dialout group; see the Linux section above |
macOS: hangs when the port name contains tty. | Use the corresponding /dev/cu.* device instead |
11. Command line (optional)
# List the available serial ports
python -m src.gui.factory_calibration_tool --list-ports

# Start with a specific port
python -m src.gui.factory_calibration_tool --port COM3