

Custom Protocol Entry Creation
1. Voice Chip Firmware Creation
1.1 Precautions
The module is already flashed with the speech recognition firmware at the factory, and the factory firmware is also provided in the resource archive. If you need to recreate the firmware, you can follow the steps below to create it.
1.2 Firmware Creation
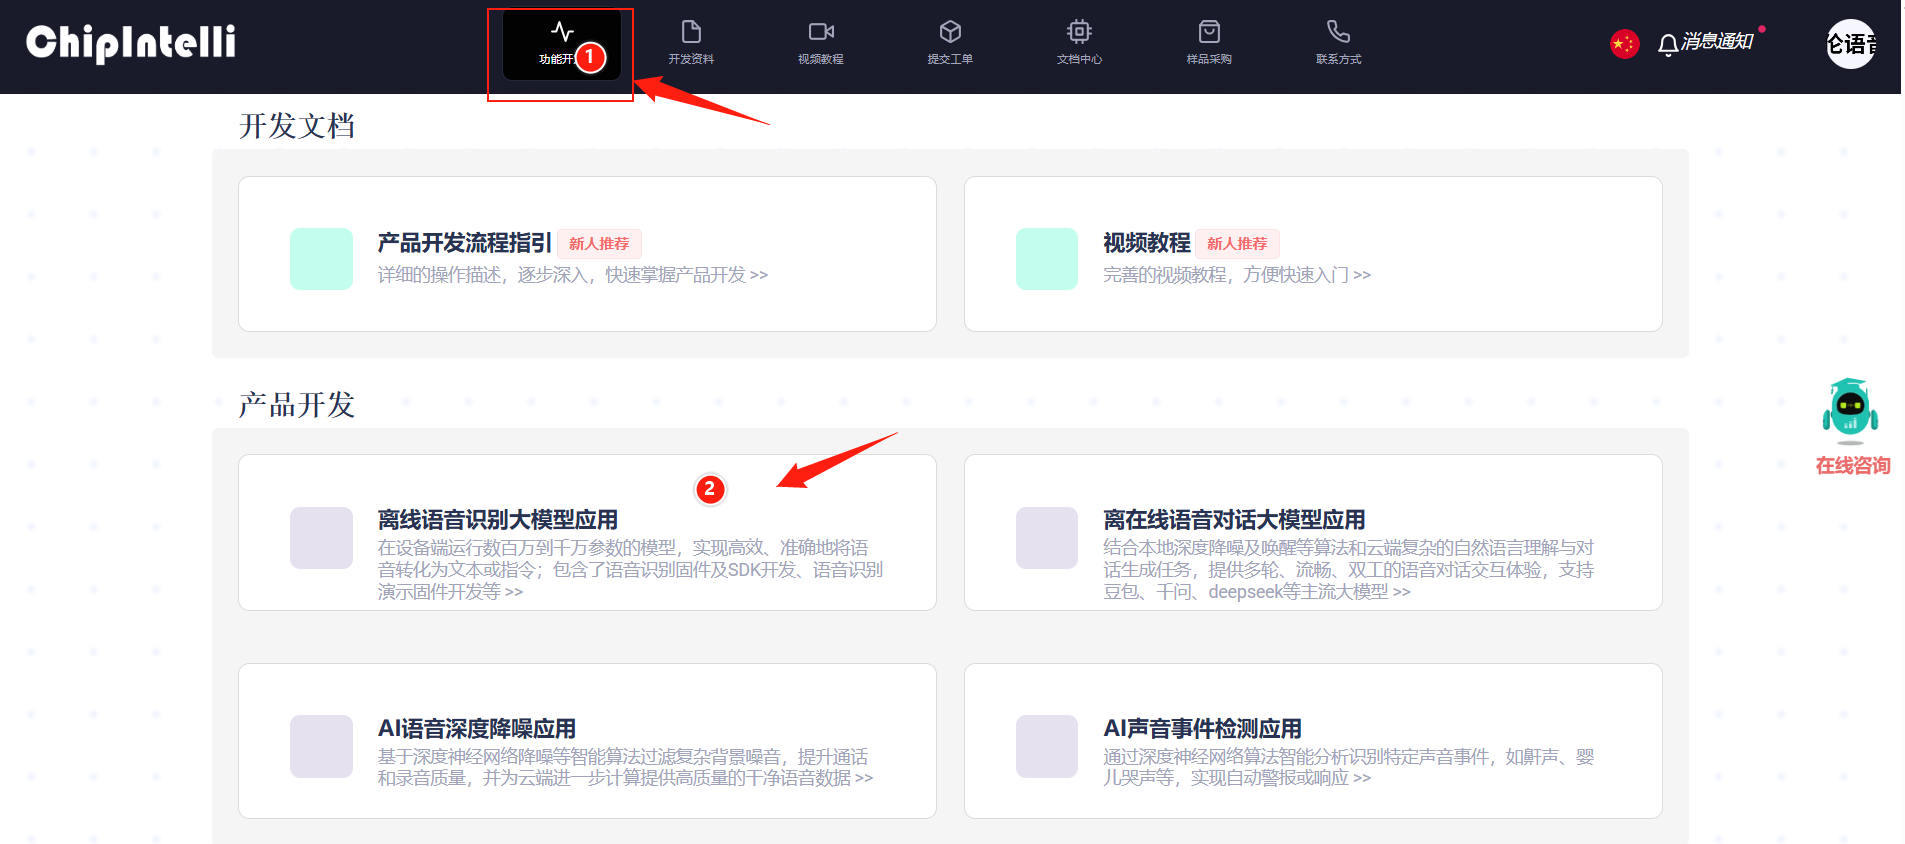
First you need to open the "Chipintelli Voice AI Platform" link to enter the firmware creation website. Click "Function Development" in the menu bar, then click "Offline Speech Recognition Large-Model Application" under the product development column.
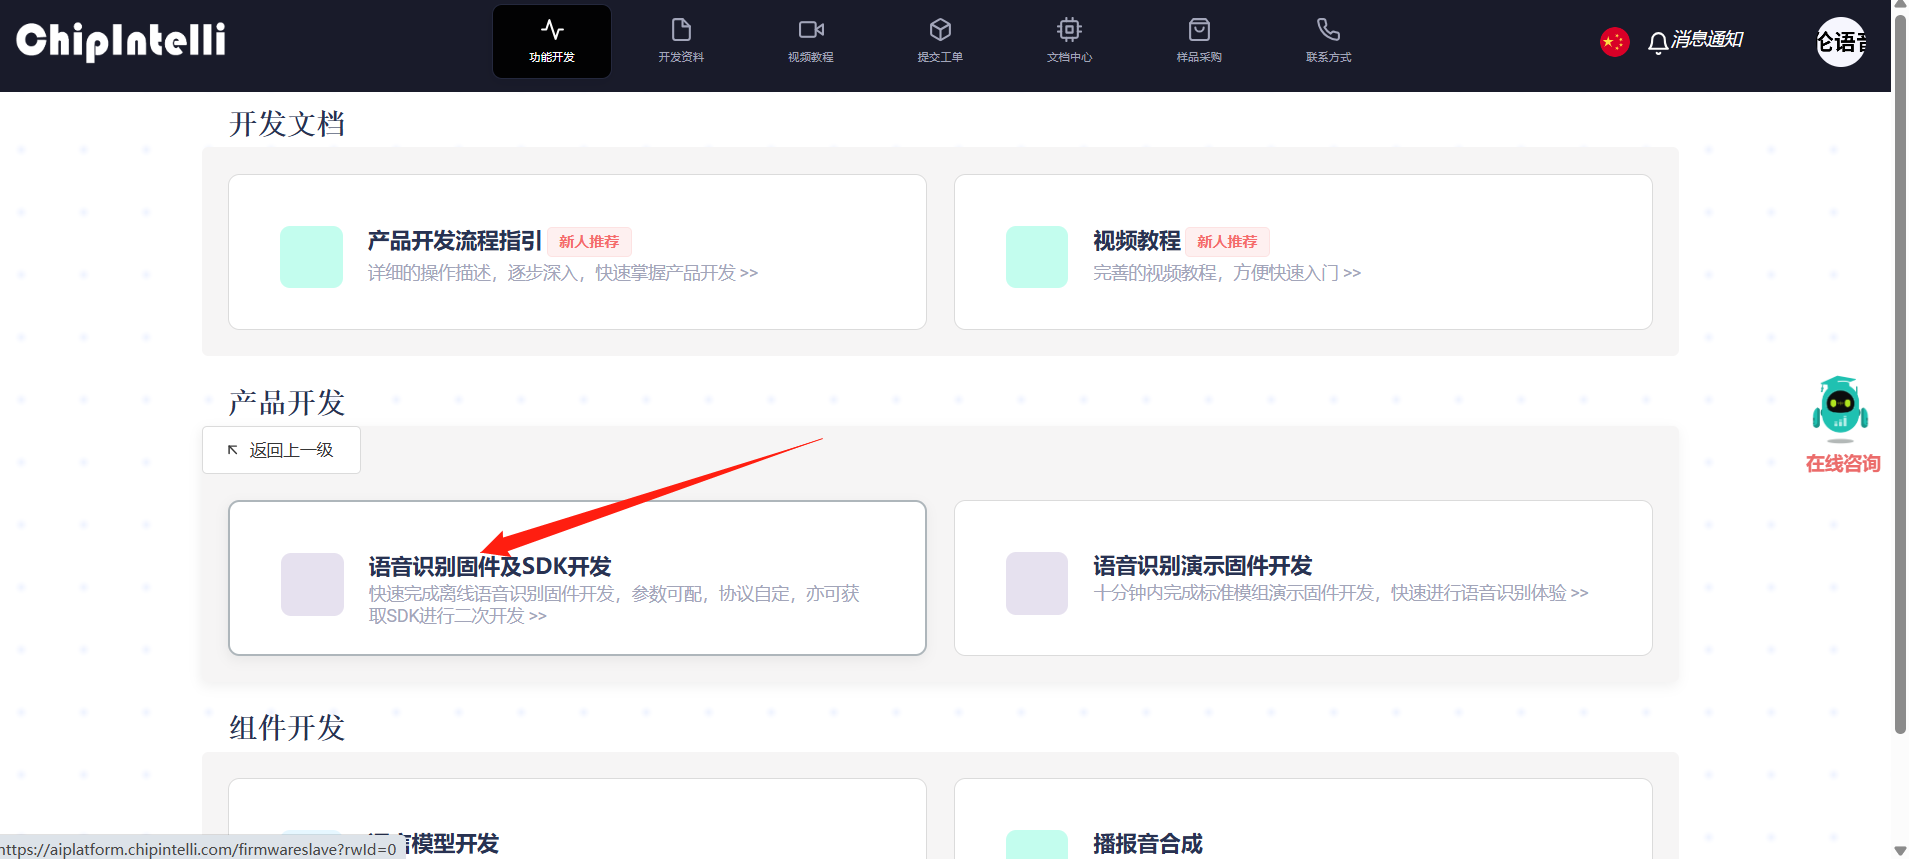
At this point you will be prompted to log in. You need to register a platform account with your own information; the account in this tutorial was registered in advance. After logging in, click “Speech Recognition Firmware and SDK Development” again.
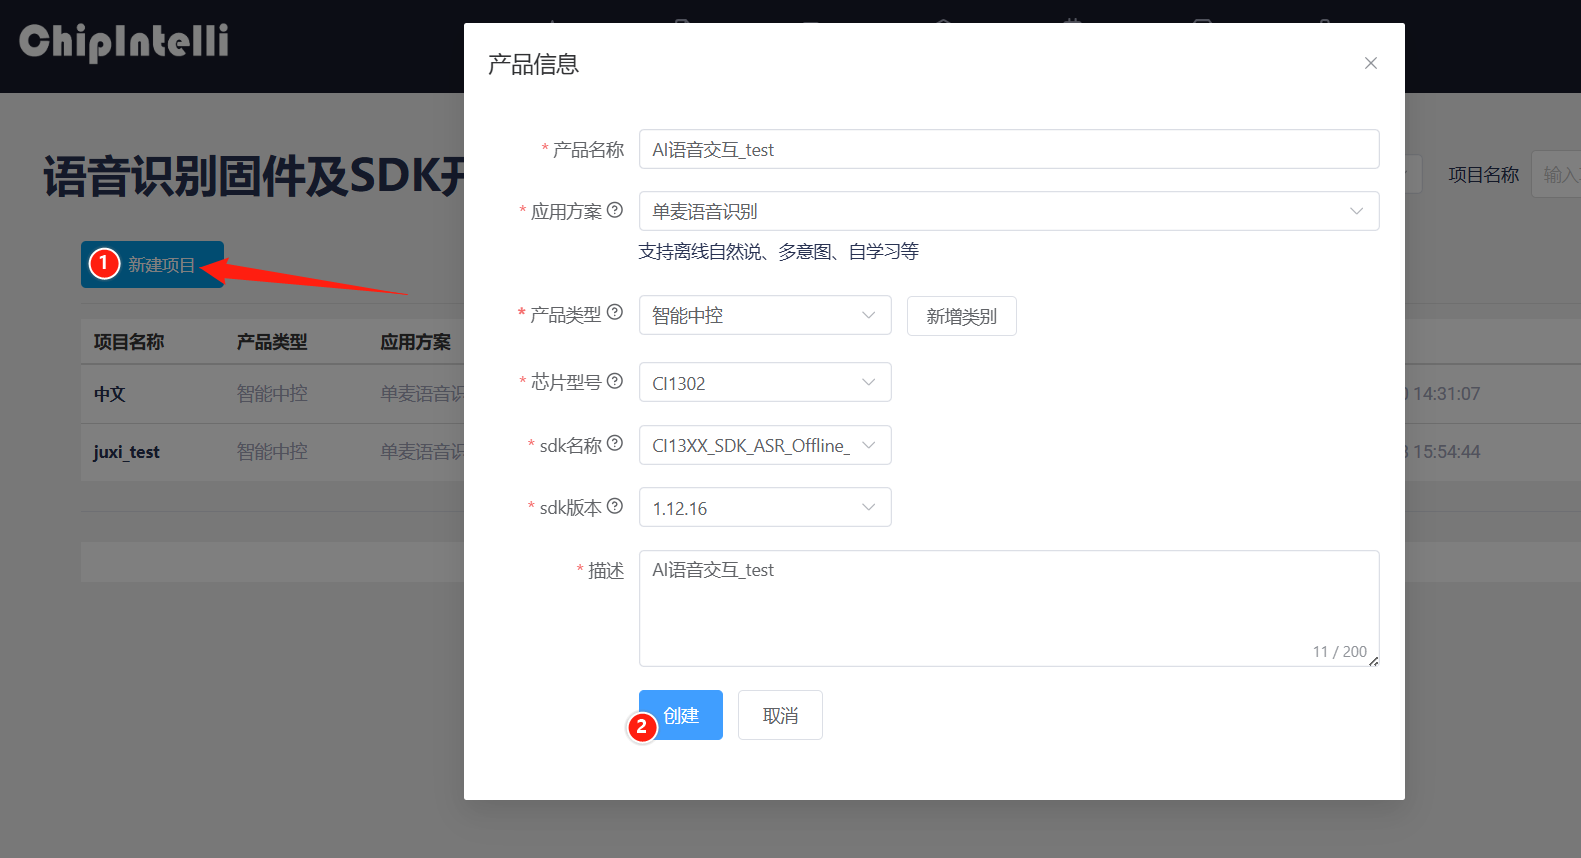
After the page jumps, click New Project on the left and create a product as shown in the figure below. The product name and description can both be customized; the remaining information must be selected according to the content in the red box, and the product type must be selected as “General->Smart Central Control”. When done, click Create.
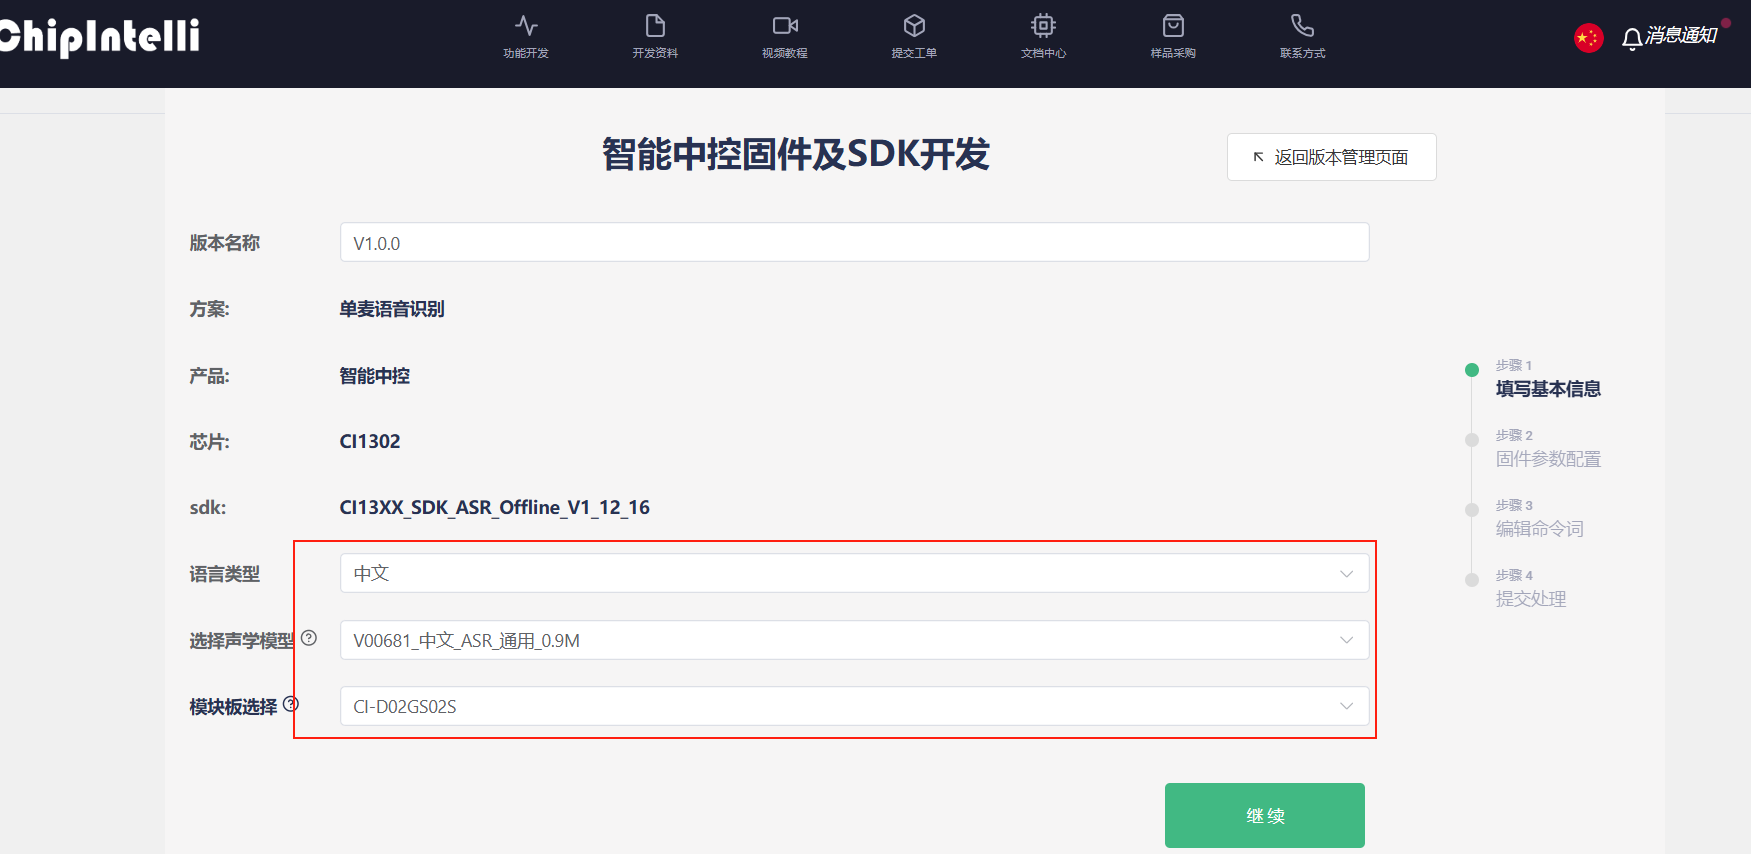
Next you need to fill in the basic information for the project. We need to recognize Chinese, so select “Chinese” as the language type; if you need to recognize English you can modify it accordingly. For the other information, just select as shown in the figure below, then click Continue.
Then you need to configure the firmware; here we only explain the parts that need to be modified. Turn on echo cancellation in the algorithm parameters.

In the hardware parameters, the crystal oscillator source needs to be selected as “Internal RC”.
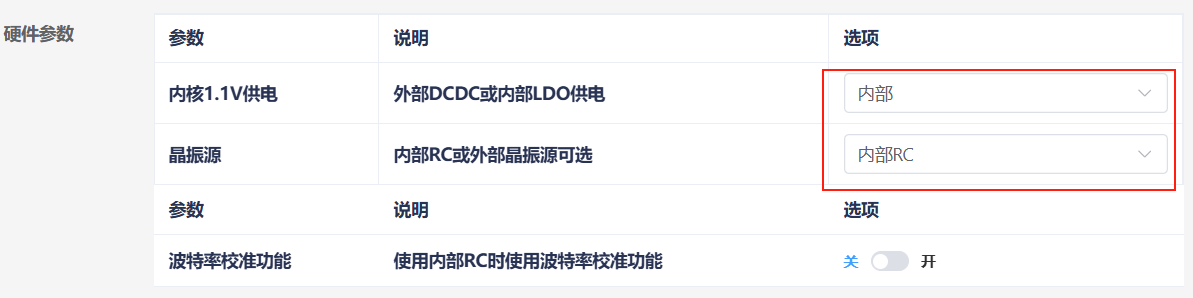
In the print serial port configuration, configure the UART0 level as open-drain, supporting an external 5V pull-up.
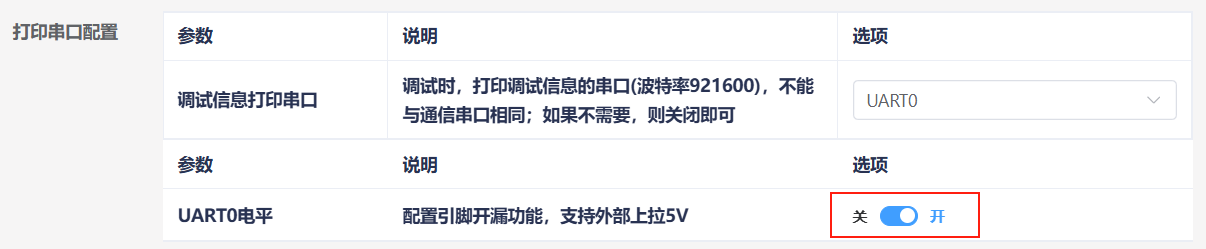
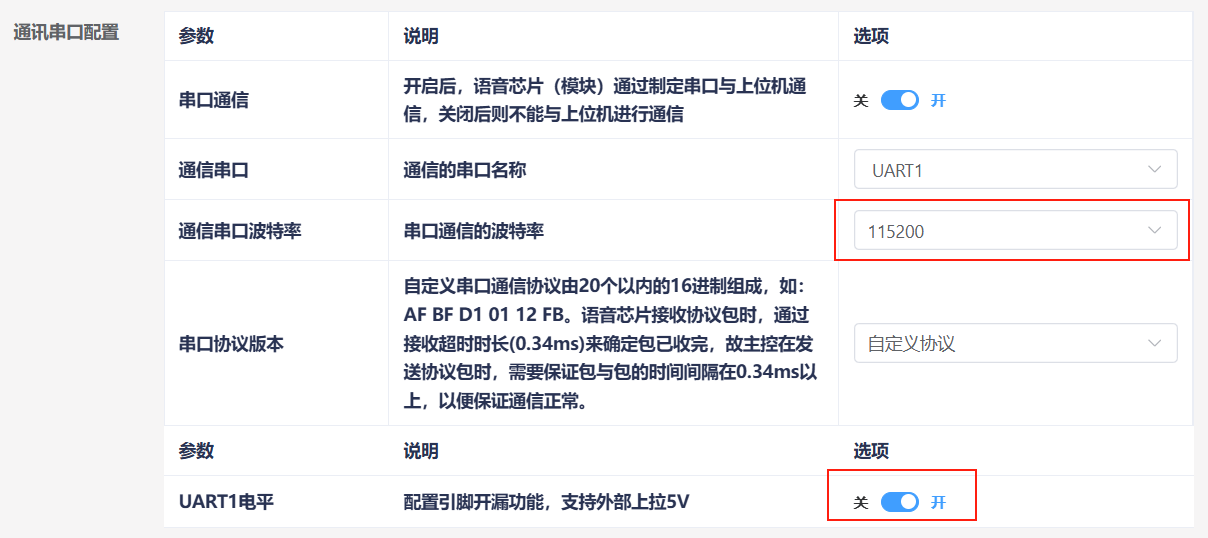
Modify the communication serial port configuration: set the baud rate to 115200 and configure the UART1 level as open-drain, supporting an external 5V pull-up. After configuration is complete, click “Continue” to proceed to the next step.
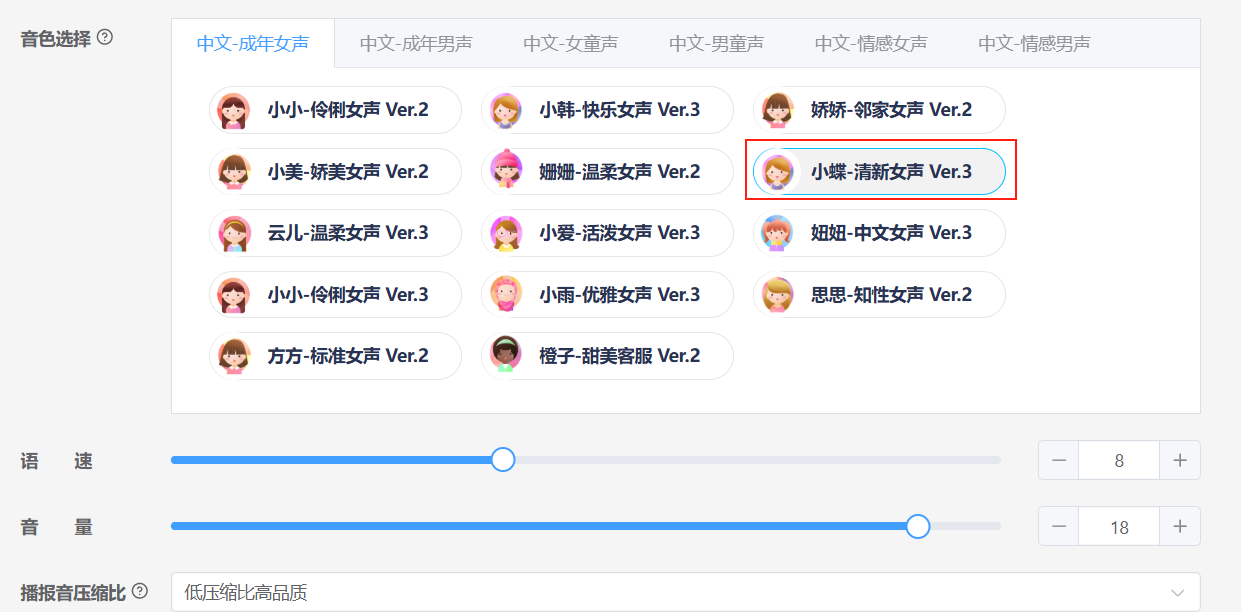
Next we enter the edit command words function. First you need to select the playback voice; here we select “小蝶-清新女声 Ver.3”.
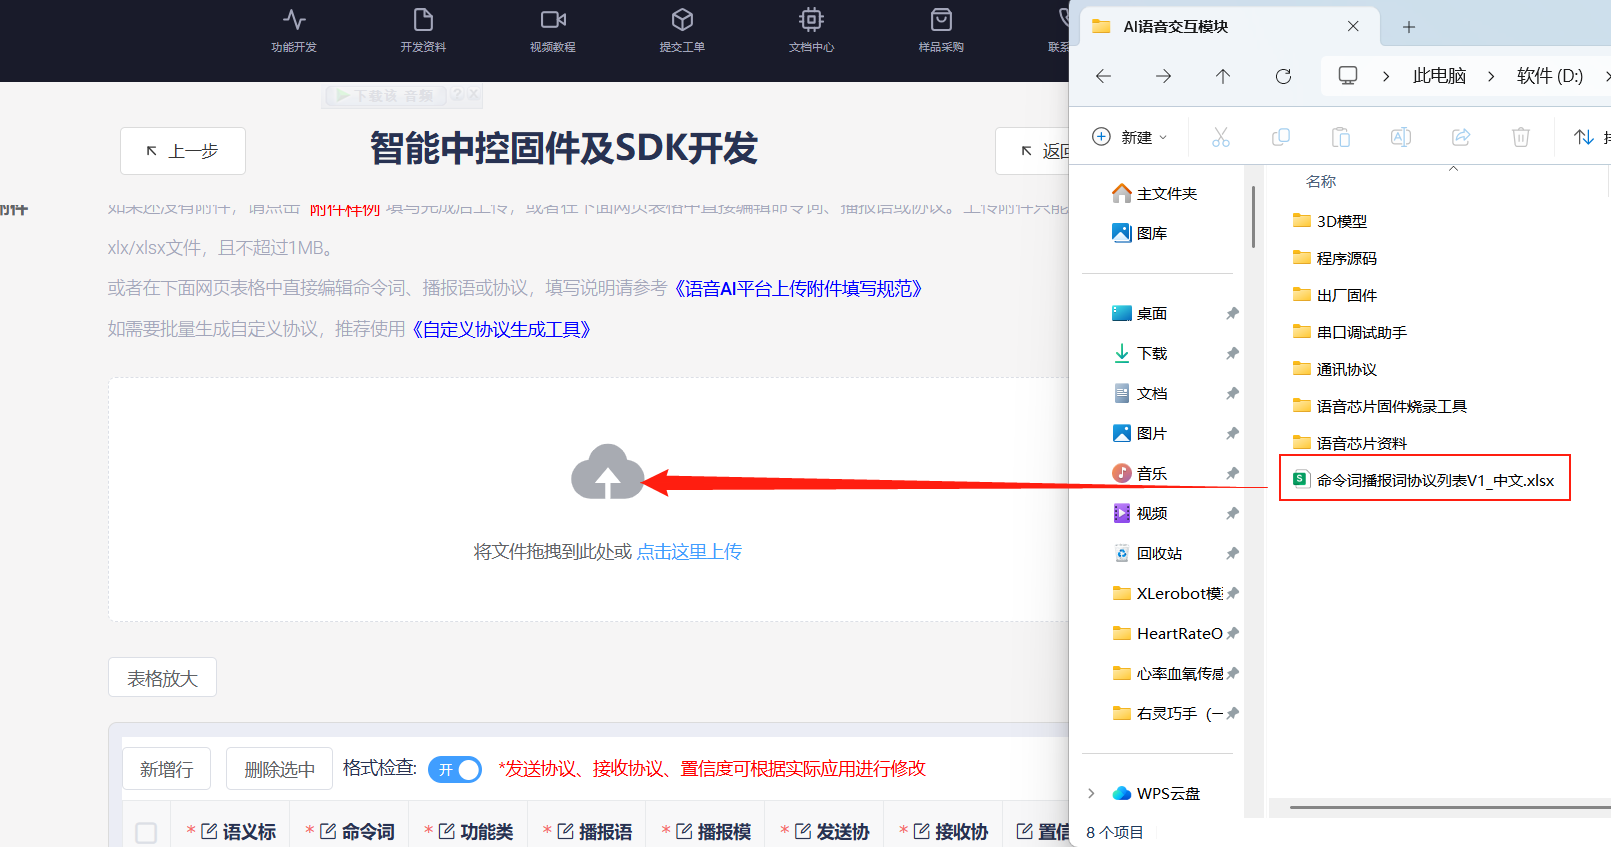
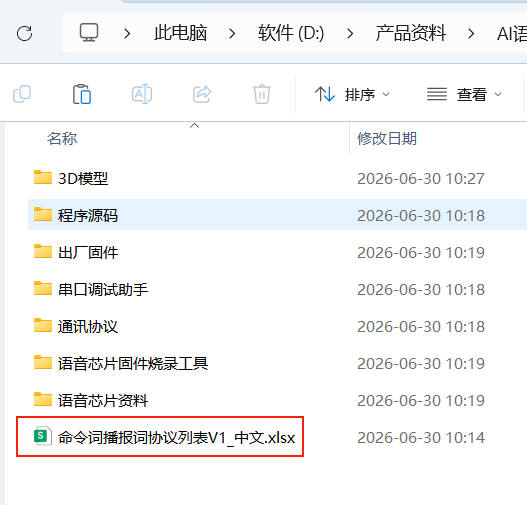
Next we upload the command word attachment. Find the “命令词播报词协议列表V1_中文” spreadsheet in the same path as this document, and drag it directly into the web page to upload it.
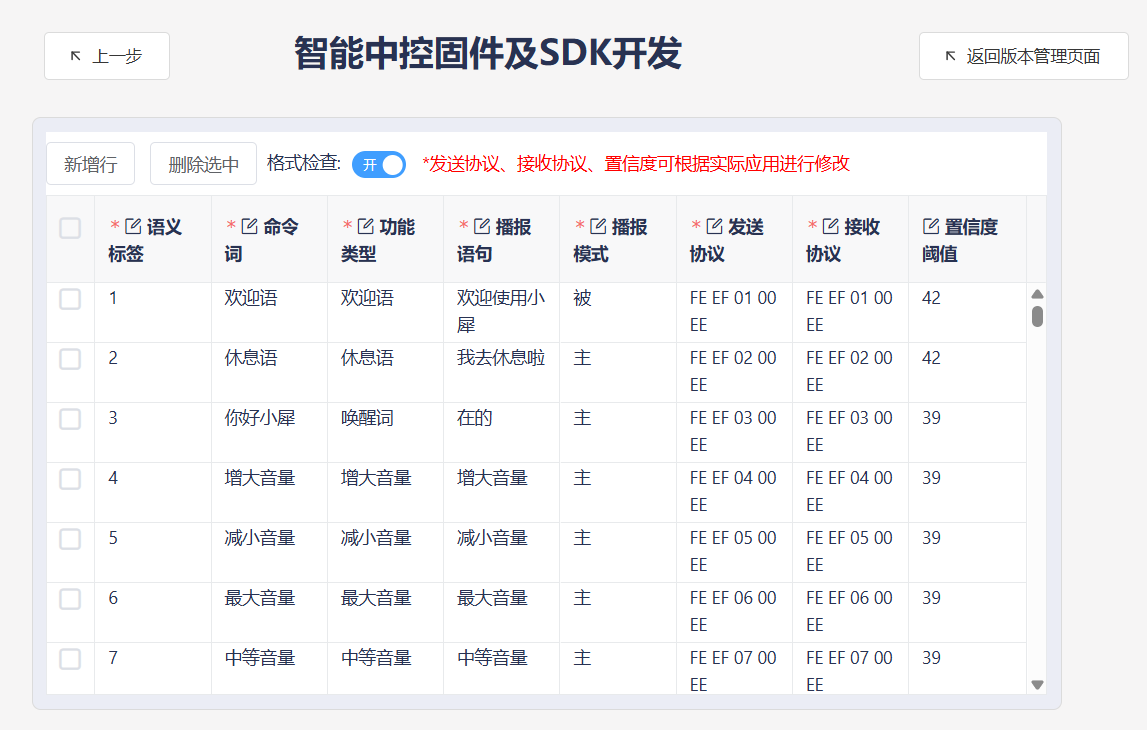
After uploading the file, you can see our command word data in the table below.
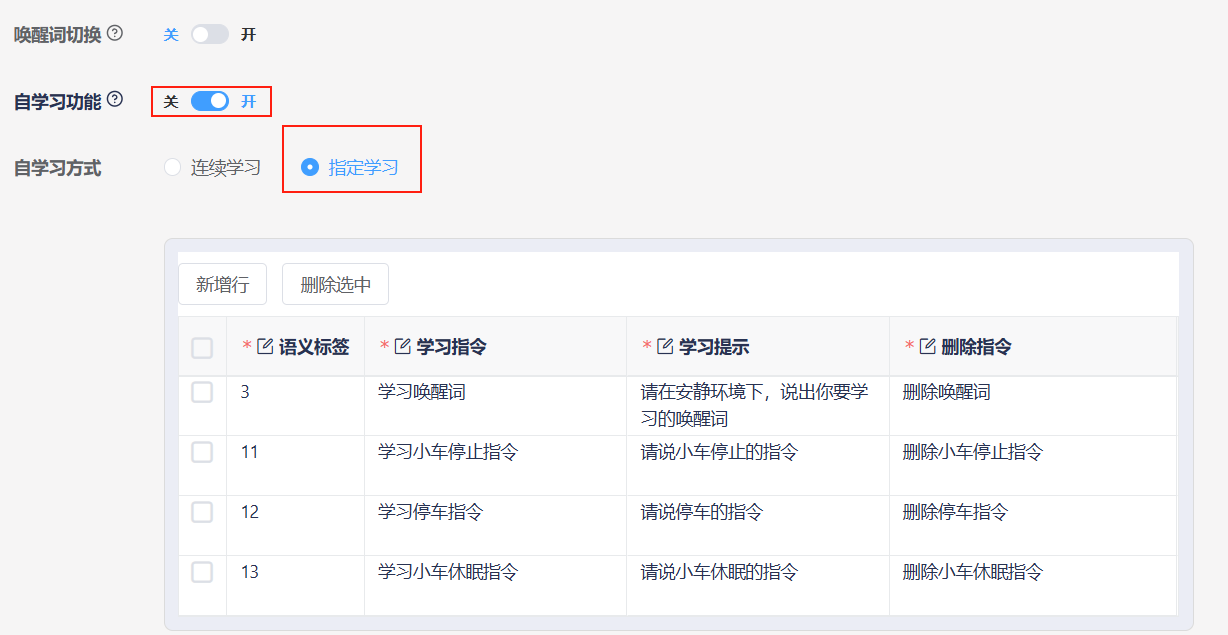
Turn on the self-learning function and select specified learning; the system will automatically generate 4 self-learning commands, which we do not modify here.
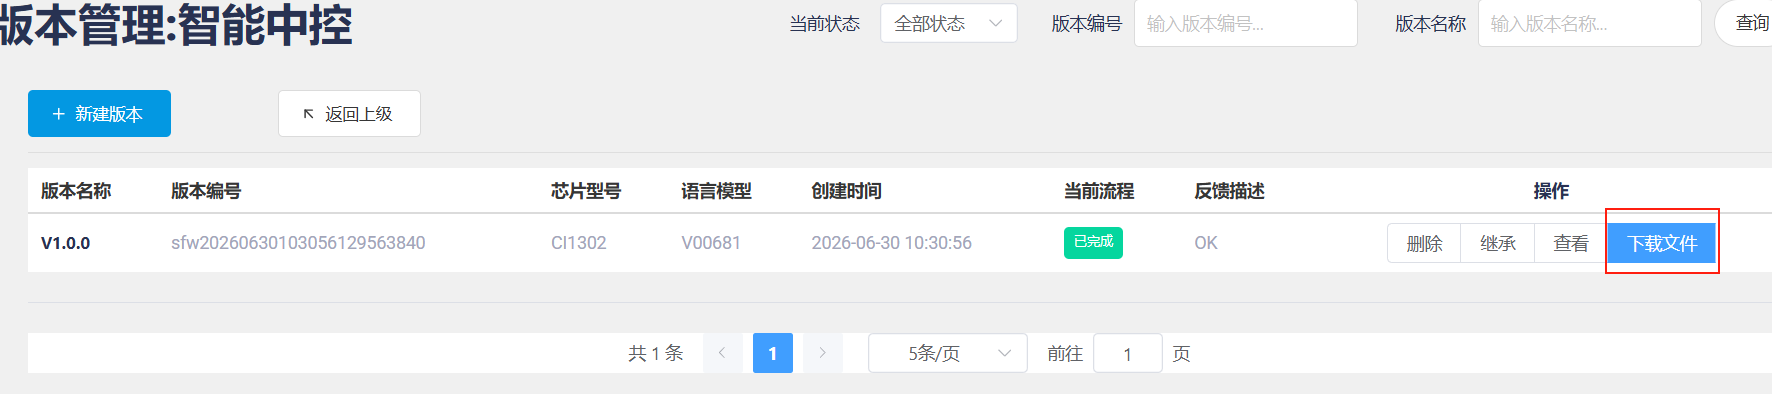
After submitting, wait a few minutes for the firmware creation to complete; when finished, click Download Firmware to obtain the created firmware.
For the firmware flashing steps, see "Module Firmware Flashing".
2. Modify Functional Entries
Open the command word / playback word protocol list V1_中文 file in the attachments.
Find the functional entries in the table, that is, the first 10 items. Note that these first 10 functional entries are all fixed entries; they cannot be added, only modified.

Here we take modifying the wake word's response phrase as an example: change the playback after recognizing “你好,小犀” from “在的” to “我在”.

After finishing the modifications, save. Then follow the steps in “1.2 Firmware Creation” to import the table into the website. If you have already created a firmware once, you can click the “Inherit” button in the previous project to skip the parameter configuration steps.
After re-creating the firmware, you also need to flash the firmware into the voice interaction module; this way you can modify functional entries.
3. Add New Command Entries
Open the command word / playback word protocol list V1_中文 file in the attachments.
At the very bottom of the table, add a new command entry; here we take adding a “打扫房间” command word as an example.

Here you need to select “命令词” as the function type and set the playback mode to “主”, so that after recognizing “打扫房间” it will actively play back “好的”.

Below let us understand the send protocol. The 1st and 2nd data positions are the data frame header and do not need to be modified. When we select the function type as a command word, then according to the send protocol, the 3rd data position must be “00”; this is to distinguish whether the command is a “命令词” or a “播报语”.

The 4th data position is the data ID of the command word; this is hexadecimal data. Because the ID of the previous command word is “8B”, we need to set this position to “8C”. In special cases the data IDs can also be the same, for example when the returned results of the two command words below are identical.

The 5th position in the protocol is fixed as “EE” and likewise does not need to be modified. In the table, the send protocol and the receive protocol must be kept consistent.

After finishing the modifications, save. Then follow the steps in “1.2 Firmware Creation” to import the table into the website. If you have already created a firmware once, you can click the “Inherit” button in the previous project to skip the parameter configuration steps
After re-creating the firmware, you also need to flash the firmware into the voice interaction module; this way you can add new command entries.
4. Add a New Response Phrase
Open the command word / playback word protocol list V1_中文 file in the attachments.
At the very bottom of the table, add a new command entry; here we take adding a “现在是晚上” response phrase as an example.

Here you need to select “播报语” as the function type and set the playback mode to “被”.

Below let us understand the send protocol. The 1st and 2nd data positions are the data frame header and do not need to be modified. When we select the function type as a response phrase, then according to the send protocol, the 3rd data position must be “FF”; this is to distinguish that the command is a “播报语”.

The 4th data position is the data ID of the command word; this is hexadecimal data. Because the ID of the previous response phrase is “8B”, we need to set this position to “8C”.
The 5th position in the protocol is fixed as “EE” and likewise does not need to be modified. In the table, the send protocol and the receive protocol must be kept consistent.

After finishing the modifications, save. Then follow the steps in “1.2 Firmware Creation” to import the table into the website. If you have already created a firmware once, you can click the “Inherit” button in the previous project to skip the parameter configuration steps.
After re-creating the firmware, you also need to flash the firmware into the voice interaction module; this way you can add new command entries.